Case Study: Teller, Melbourne
Introduction – From Bank Tellers to Record Sellers
A change of use from a bank to a music hangout might not appear to be the most obvious of adaptations, but in Melbourne’s Brunswick East district things were already shifting with banks and businesses having to adapt to a financial climate in flux.
Vintage State Bank of Victoria poster
The State Bank of Victoria was taken over by the Commonwealth Bank in 1990 and closed many branches. Initially, the bank reopened as Arkitekt Records and when this business folded in 2008, the building became a much less trendy estate agents.
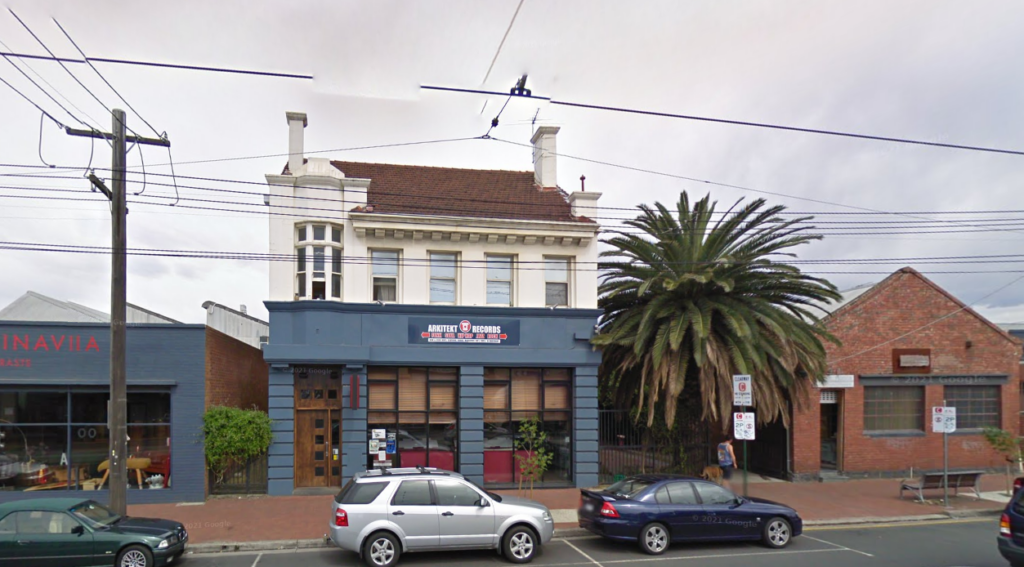
Arkitekt Records’s store in 2006
If we fast forward to 2021 where, following a couple of years of dereliction, we pick up the story.
Record Crates to Wine Crates
Melanie Aldred, owner/manager of Teller, took over operations and conversion to a bar and restaurant in 2022. Now, a couple of successful years later, upgrading the initial audio system was within reach. This upgrade was obviously to improve sound quality, but also address some other key points, including easier control of the system and greater flexibility of routing audio around the venue’s many zones.
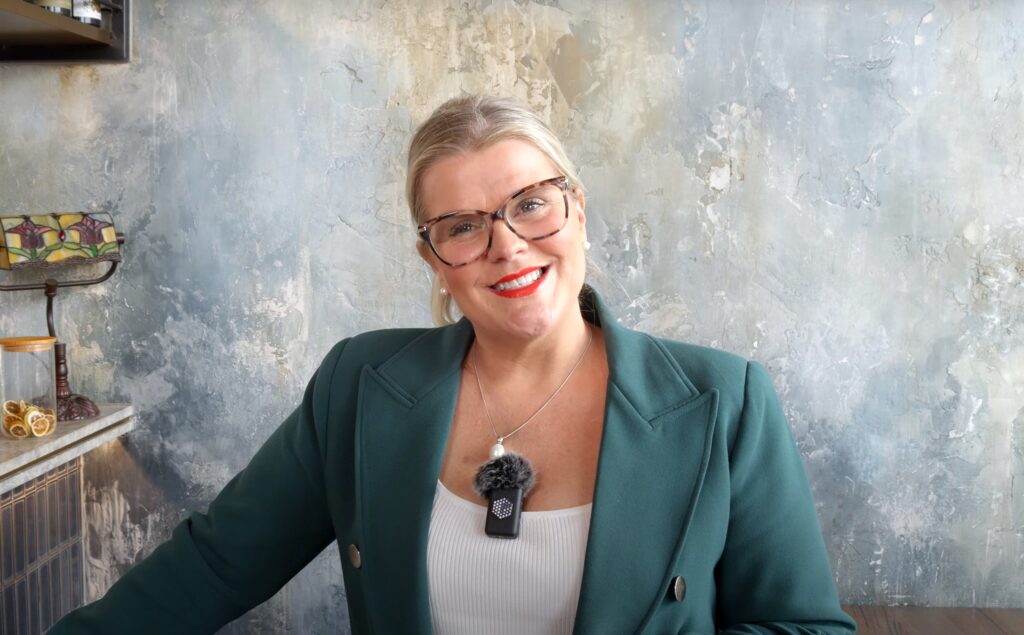
Teller’s Melanie Aldred
A local AV installer, Factory Sound, won the contract and set about making sure that the system they employed would fulfil all these requirements. Let’s have a look at their plans for the venue and how they achieved it.
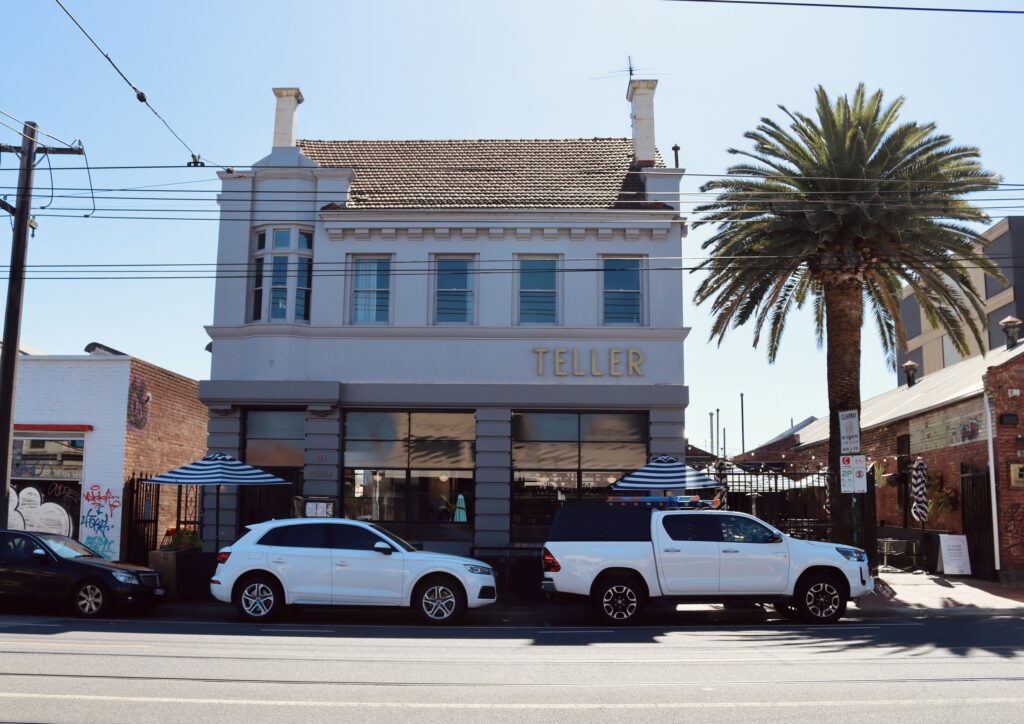
Teller today, making use of both floors of the building, plus alley and yard space
Venue Layout
The venue consists of a spacious dining room and bar at the front, leading through to a double height light filled pavilion at the rear with additional seating for diners.
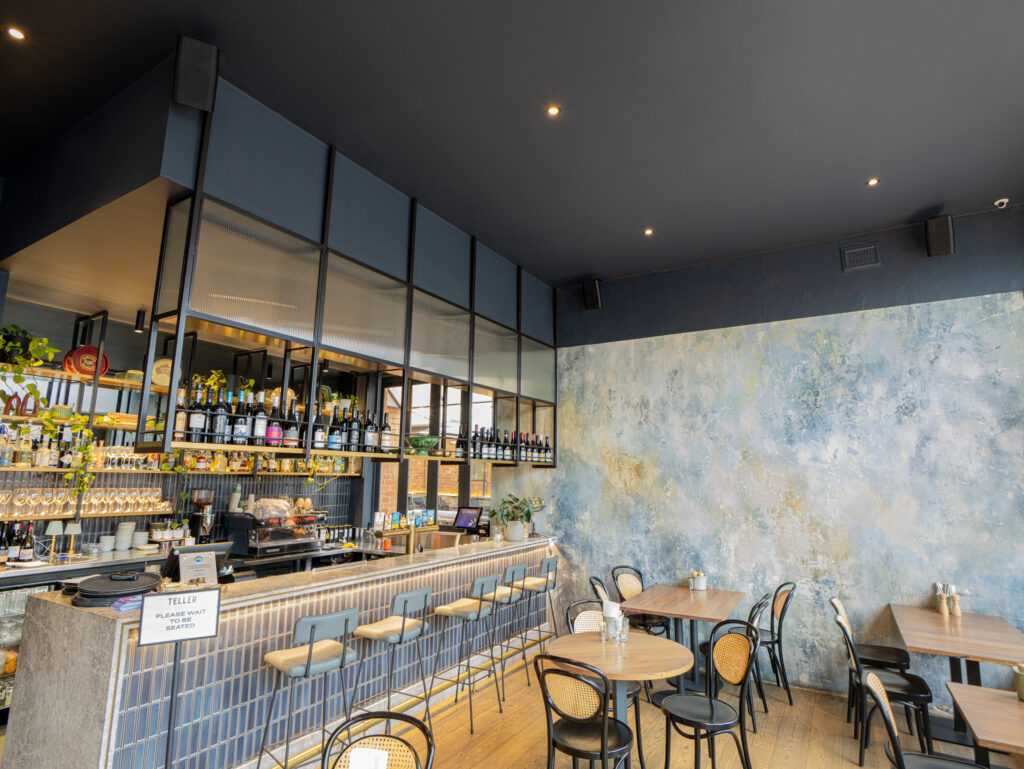
Front dining room and bar
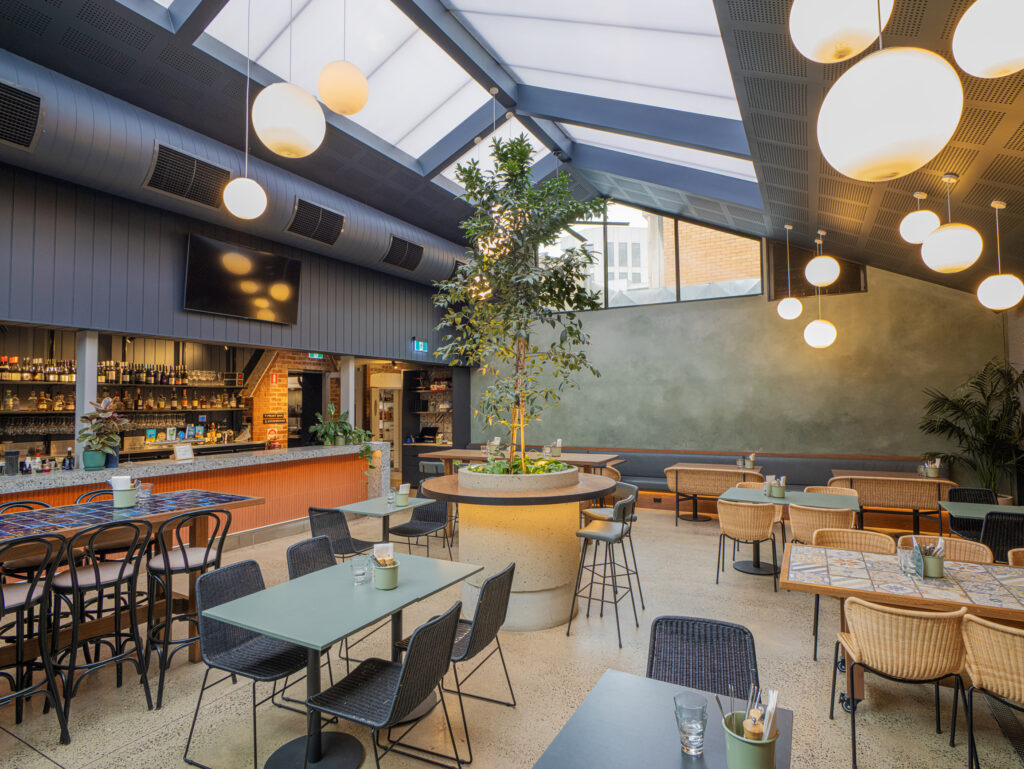
Double height pavilion bar area with further dining capacity
The annex connects to a courtyard bar along the side of the building, opening directly out on to the street again.
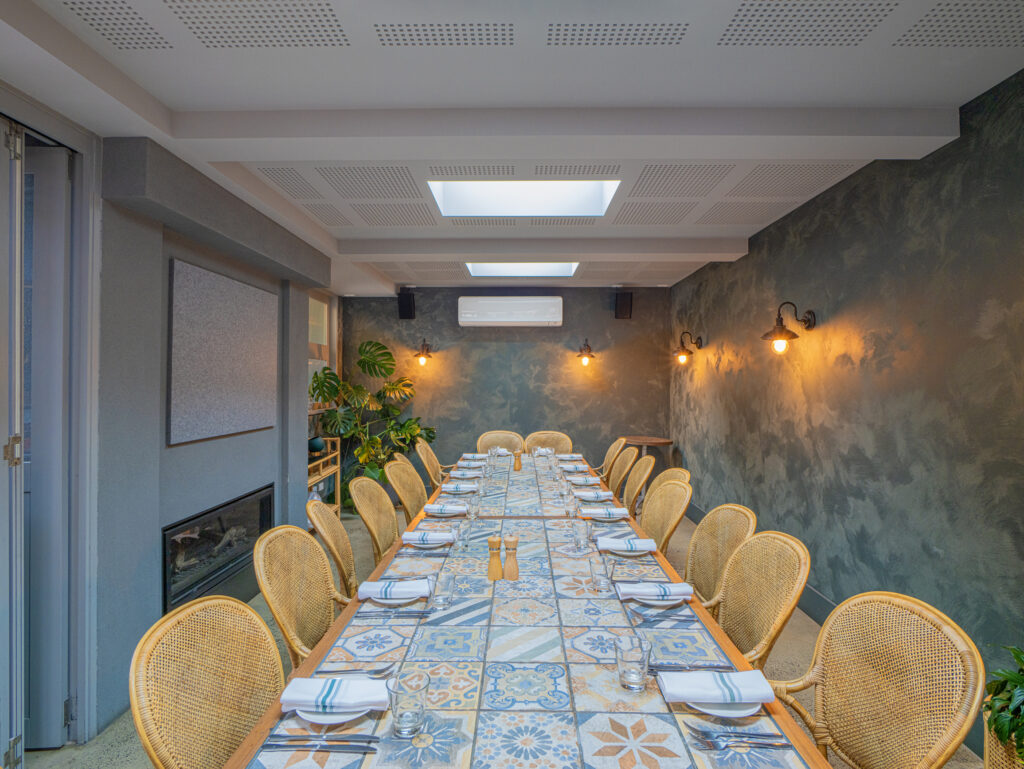
Annex can cater for large dining groups in a private space

Courtyard outside, with motorised canopy
Upstairs there is a first floor bar which can also be closed off for private functions. Both floors have their own sets of washrooms/toilets.
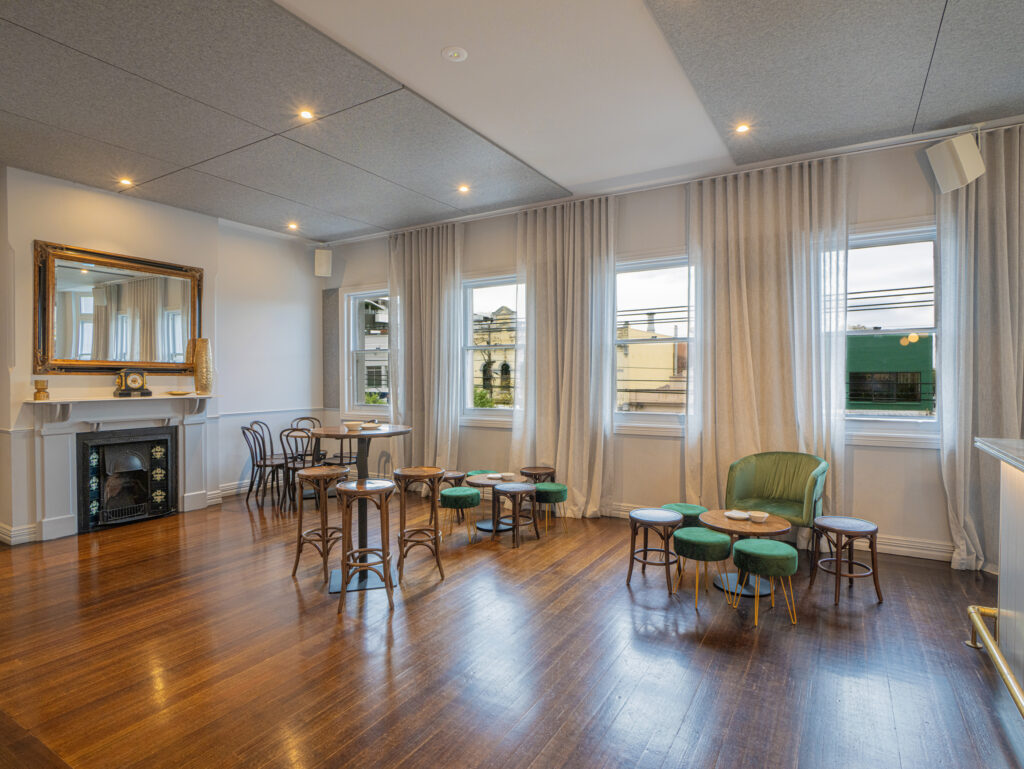
Function room on level 1 with own bar/washrooms
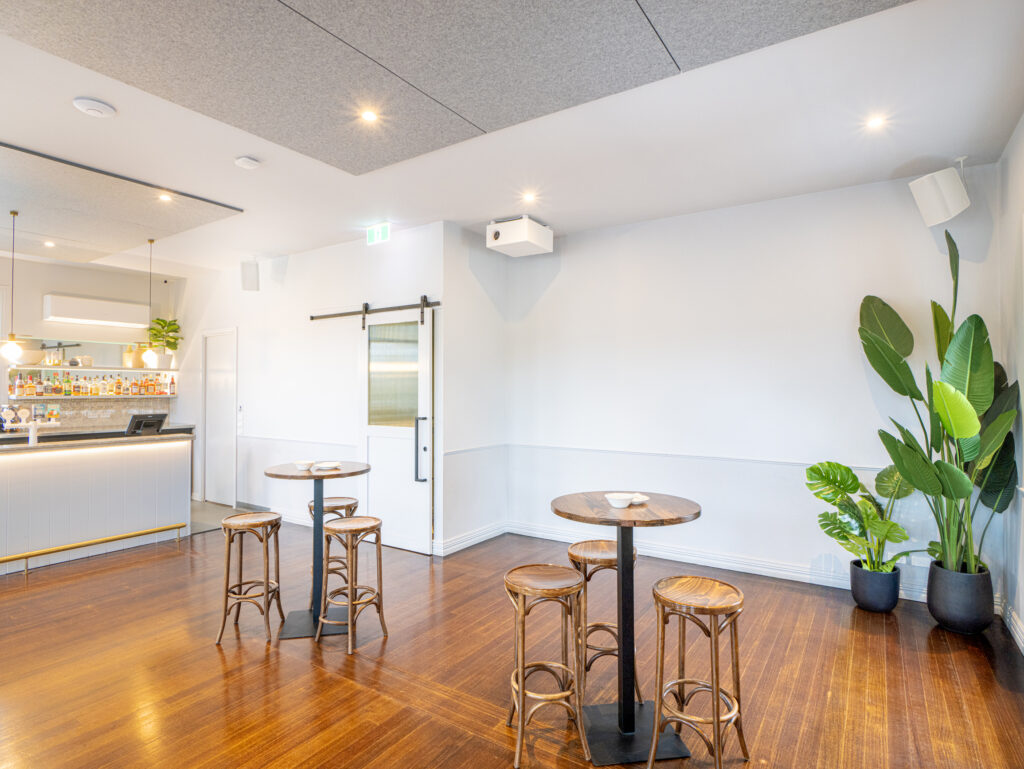
Function room on level 1 showing bar area
Factory Sound had to factor in the inclusion of some existing hardware already installed in the venue, including a large format TV and a DJ stage area as well as some Sonos streaming devices.
Installation Considerations
Opting for Australian brand Quest Audio’s speakers and amplifiers, Factory Audio decided to use two VMX88 Matrix Processors, and couple there to VR1 Venue Remote wall panels. This gave them the ability to integrate networked audio into the venue and also use this network to conveniently support the VR1 remotes.
The decision to run audio via Dante meant that any input connected to the system (either digitally or via analogue inputs on the VMX88s) would be available to select in any output zone. A couple of paging mics were also a requirement for the system.
As the TV and announcement mics were existing hardware and not being replaced, Factory was able to neatly integrate them into the networks audio side of the system using Australian brand Blustream’s neat DA11AEN end point converters.
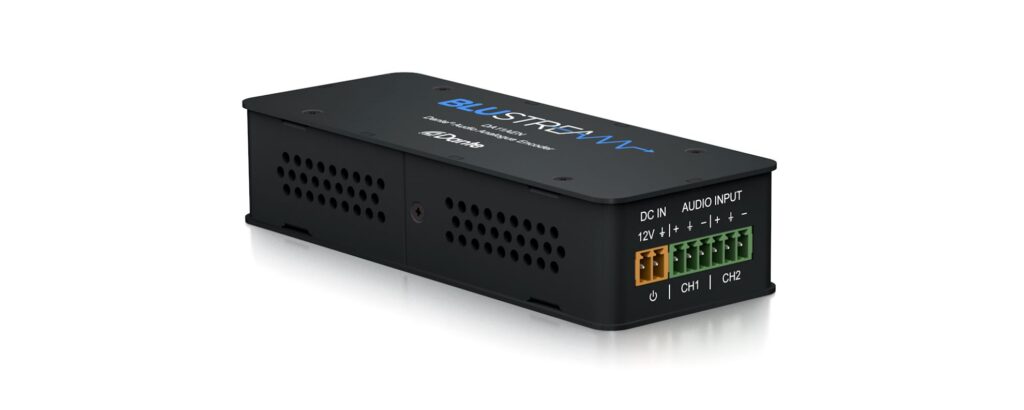
Blustream’s stereo analogue to Dante encoder
These discreet devices which are PoE enabled take a stereo line level audio signal and output it on the Dante network at up to 96k.
Audio Sources
Some of the other existing audio devices were included in the input lineup, but were close enough to the processing rack as to be connected to the VMX devices themselves, and utilize the very high quality ESS Sabre ADCs for their conversion.
The analogue input line-up for the entire venue is as follows:
VMX88 #1:
Analogue Inputs
1: Level 1 (Upstairs Function Room/Bar) Mic (with preamp)
2: Spare
3: Sonos Streamer Ground Floor (Restaurant/Pavilion) Left
4: Sonos Streamer GF Right
5: Sonos Streamer L1 Left
6: Sonos Streamer L1 Right
7: User wall plate line input L1 Left
8: User wall plate line input L1 Right
VMX88 #2:
Analogue Inputs
1: “Soundtrack Your Brand” Streamer Left
2: “Soundtrack Your Brand” Streamer Left
3-8: For future expansion
The “Soundtrack Your Brand” device is a hardware WiFi to analogue audio device that works with a subscription service to supply venues with legally streamed music, and also works as an app with Sonos devices.
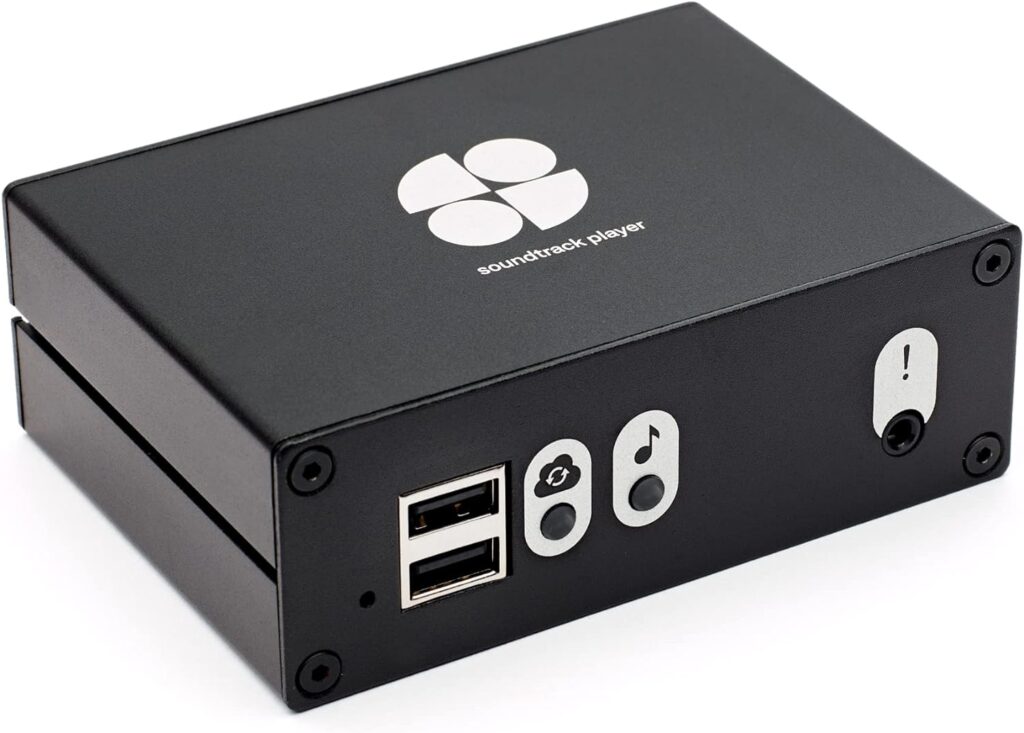
“Soundtrack Your Brand” hardware playback device: stereo analogue output
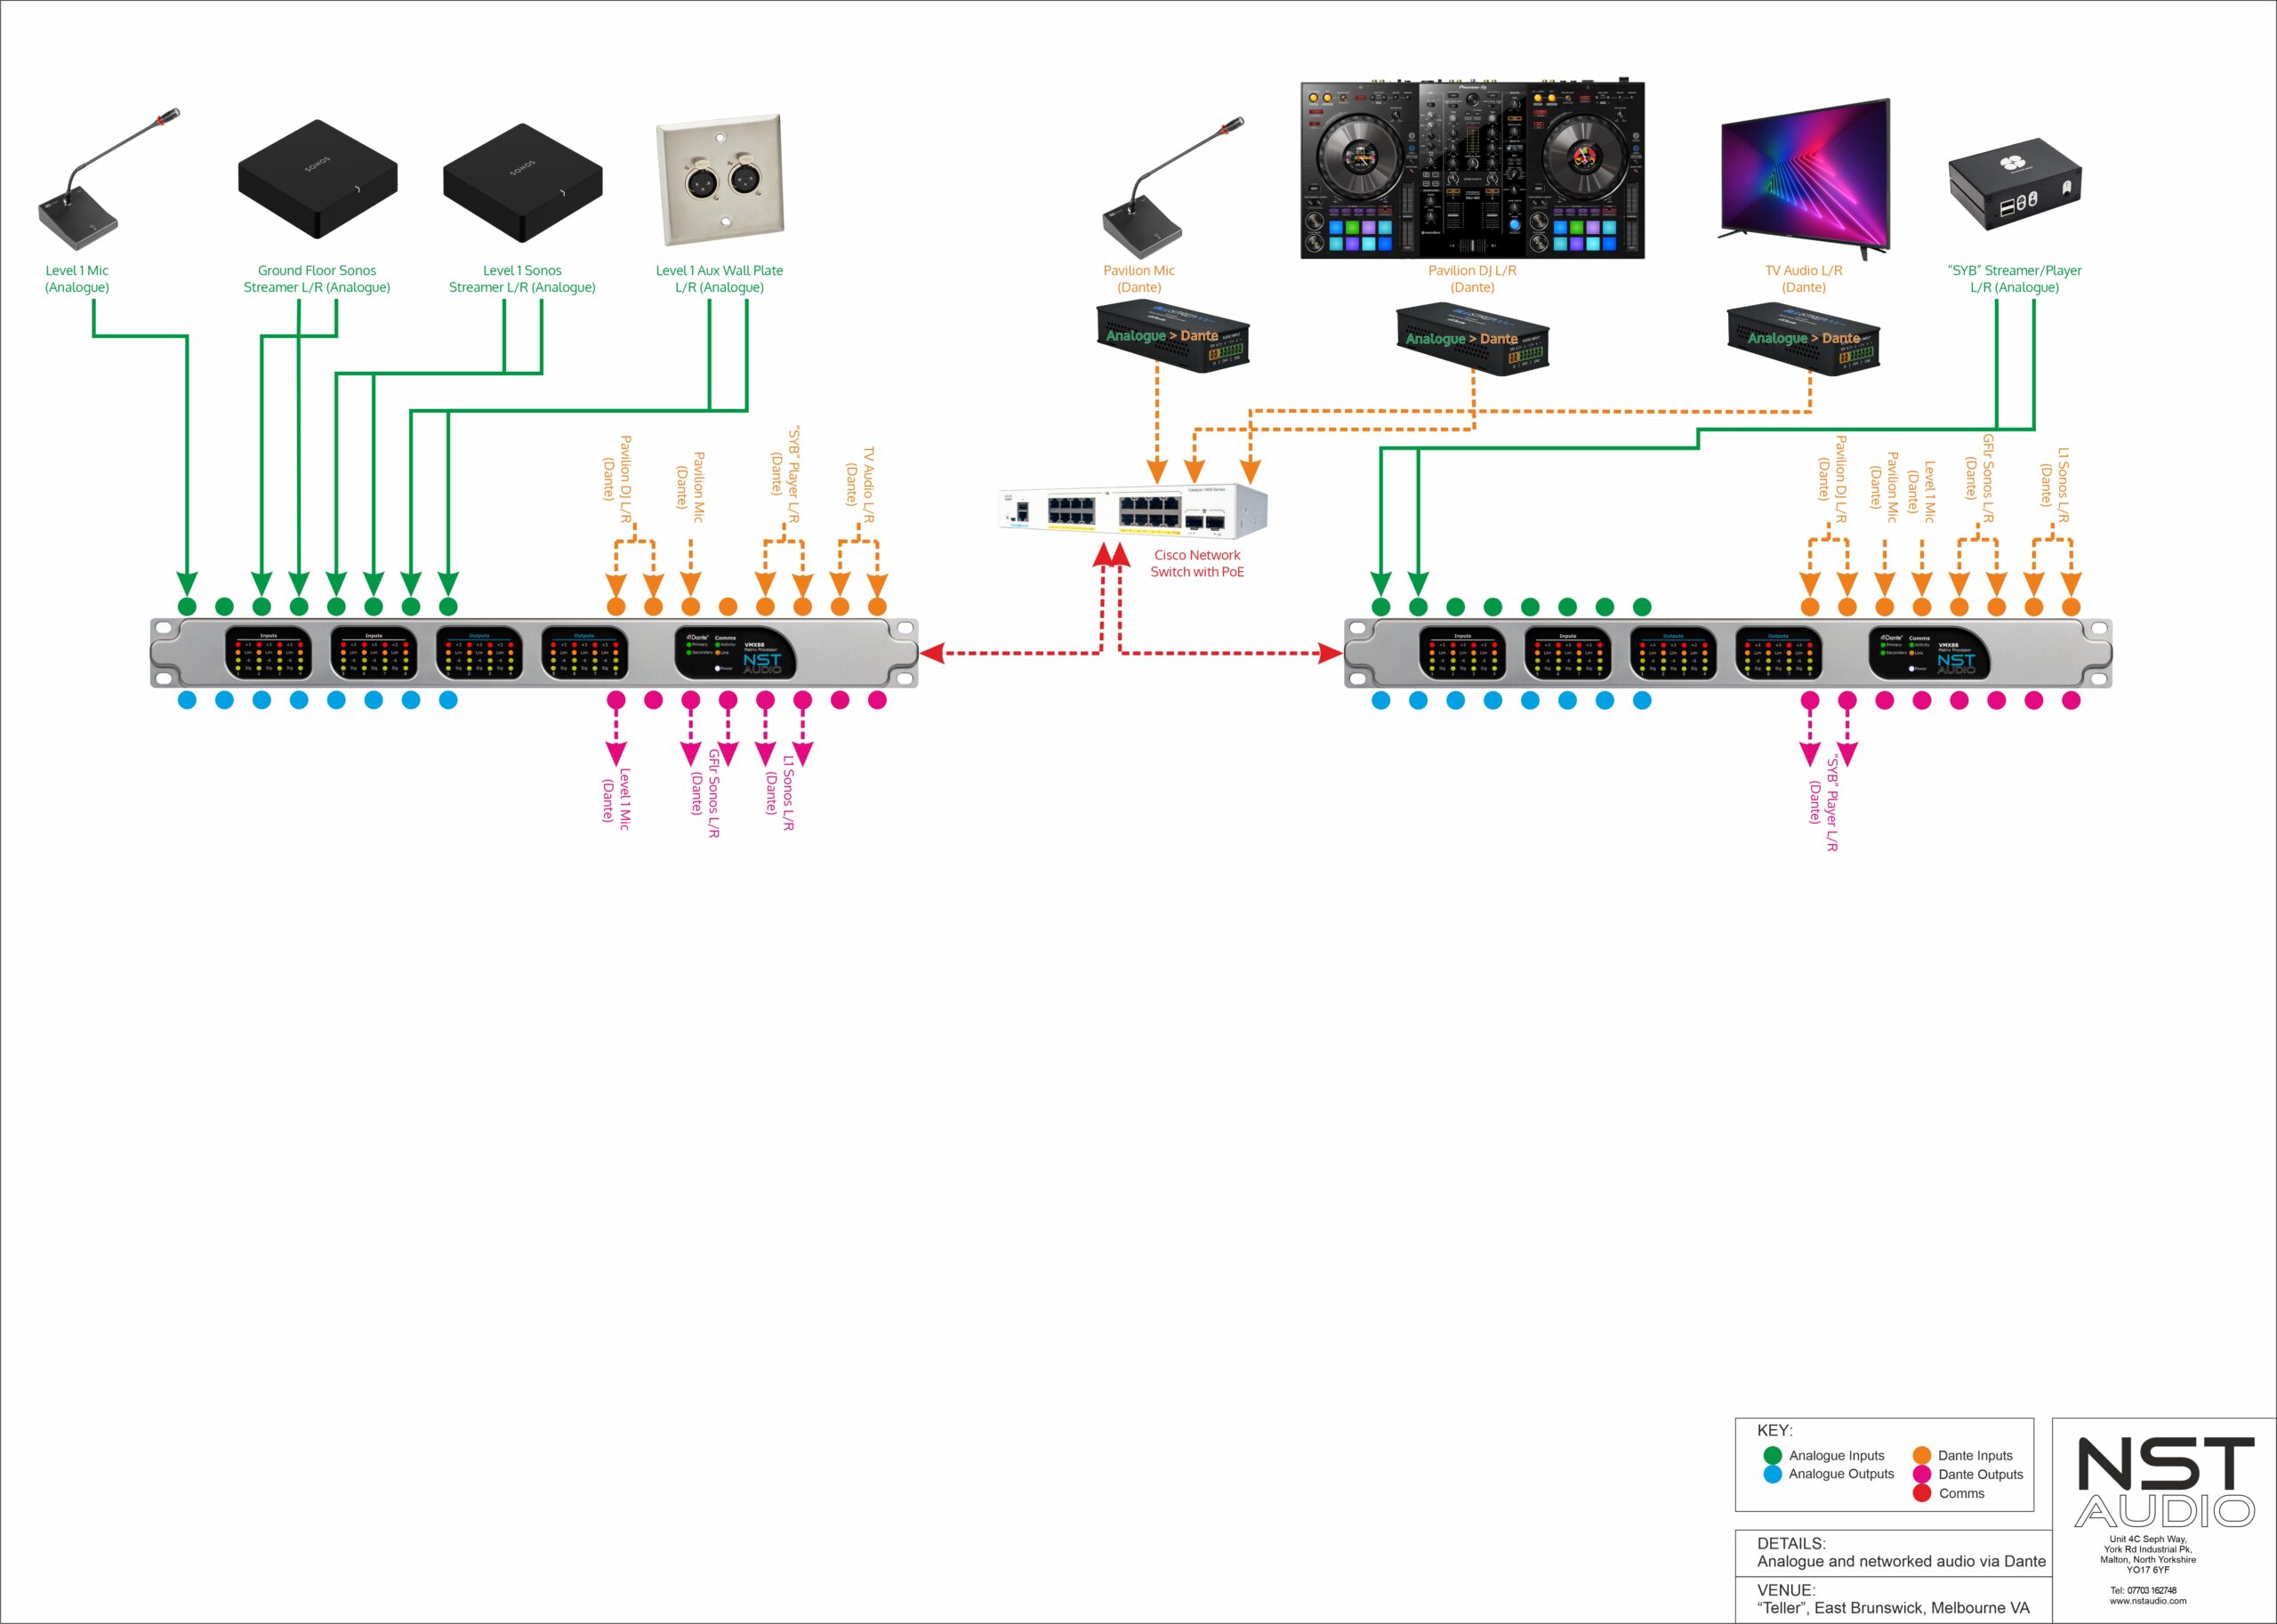
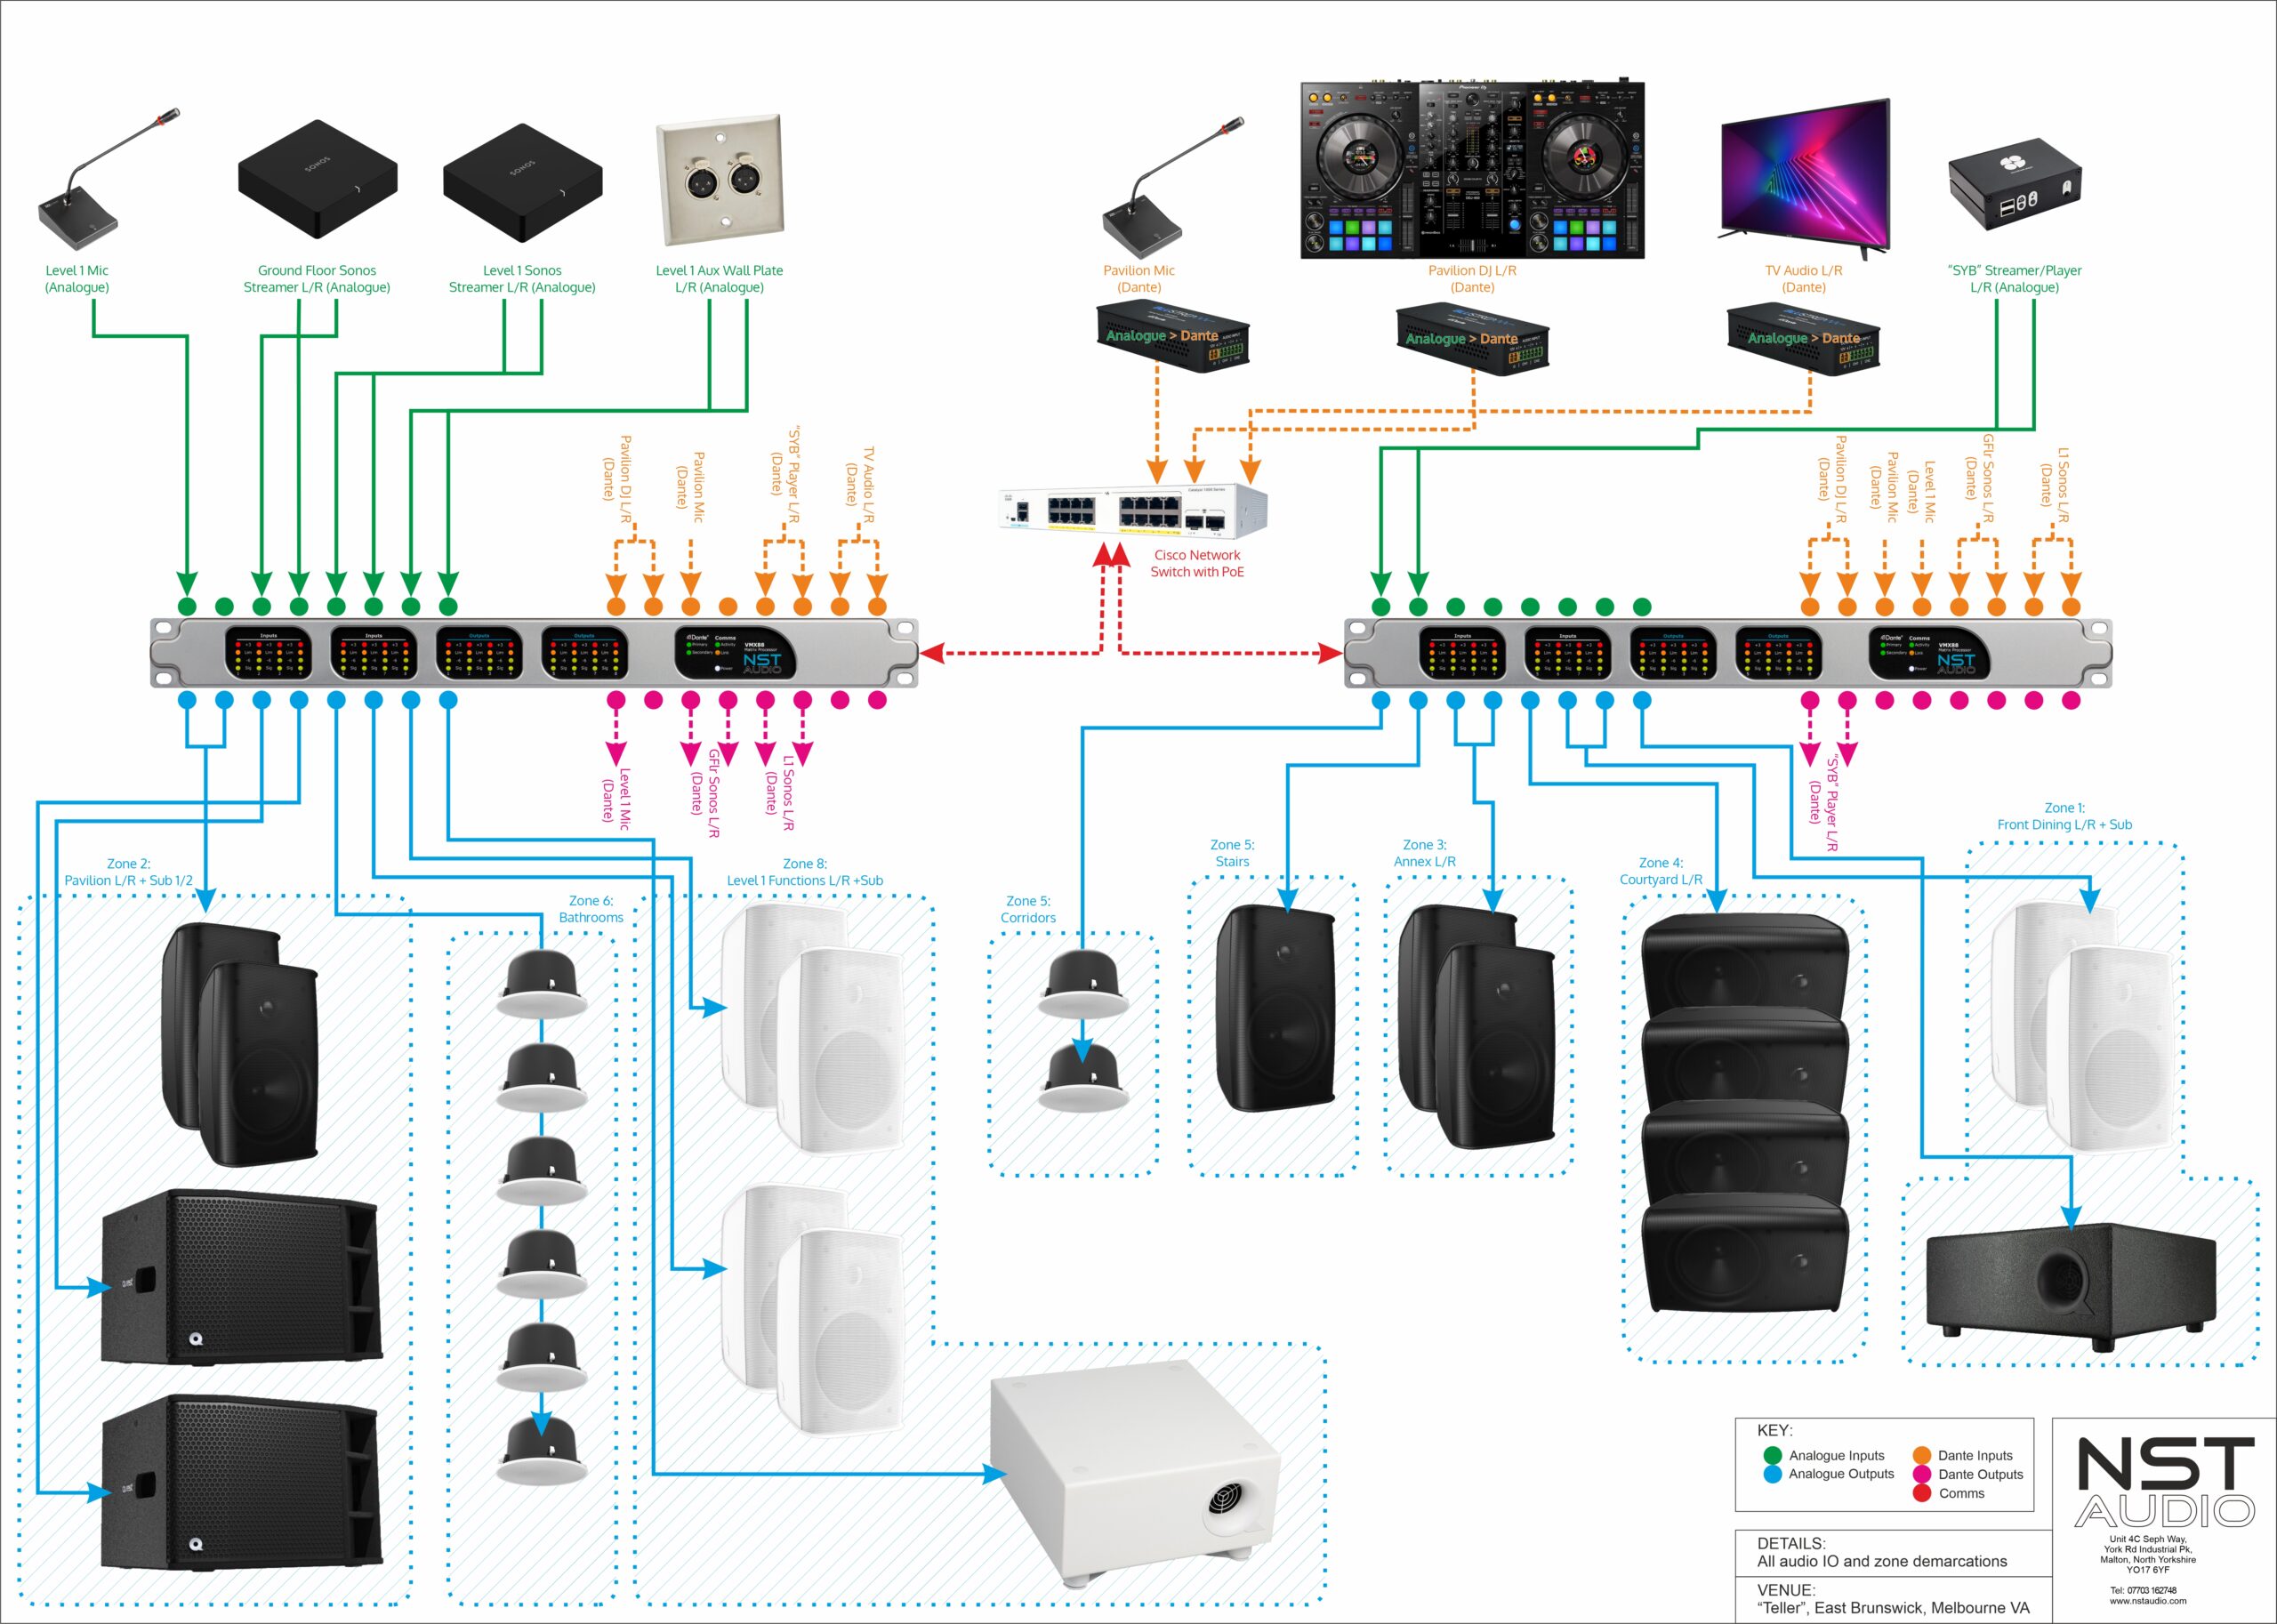
This completes the first stage of the venue’s audio system layout. The diagram below shows the analogue sources and their connections to the two VMX88 units which form the system processing – click here to open in a new window for a closer look…
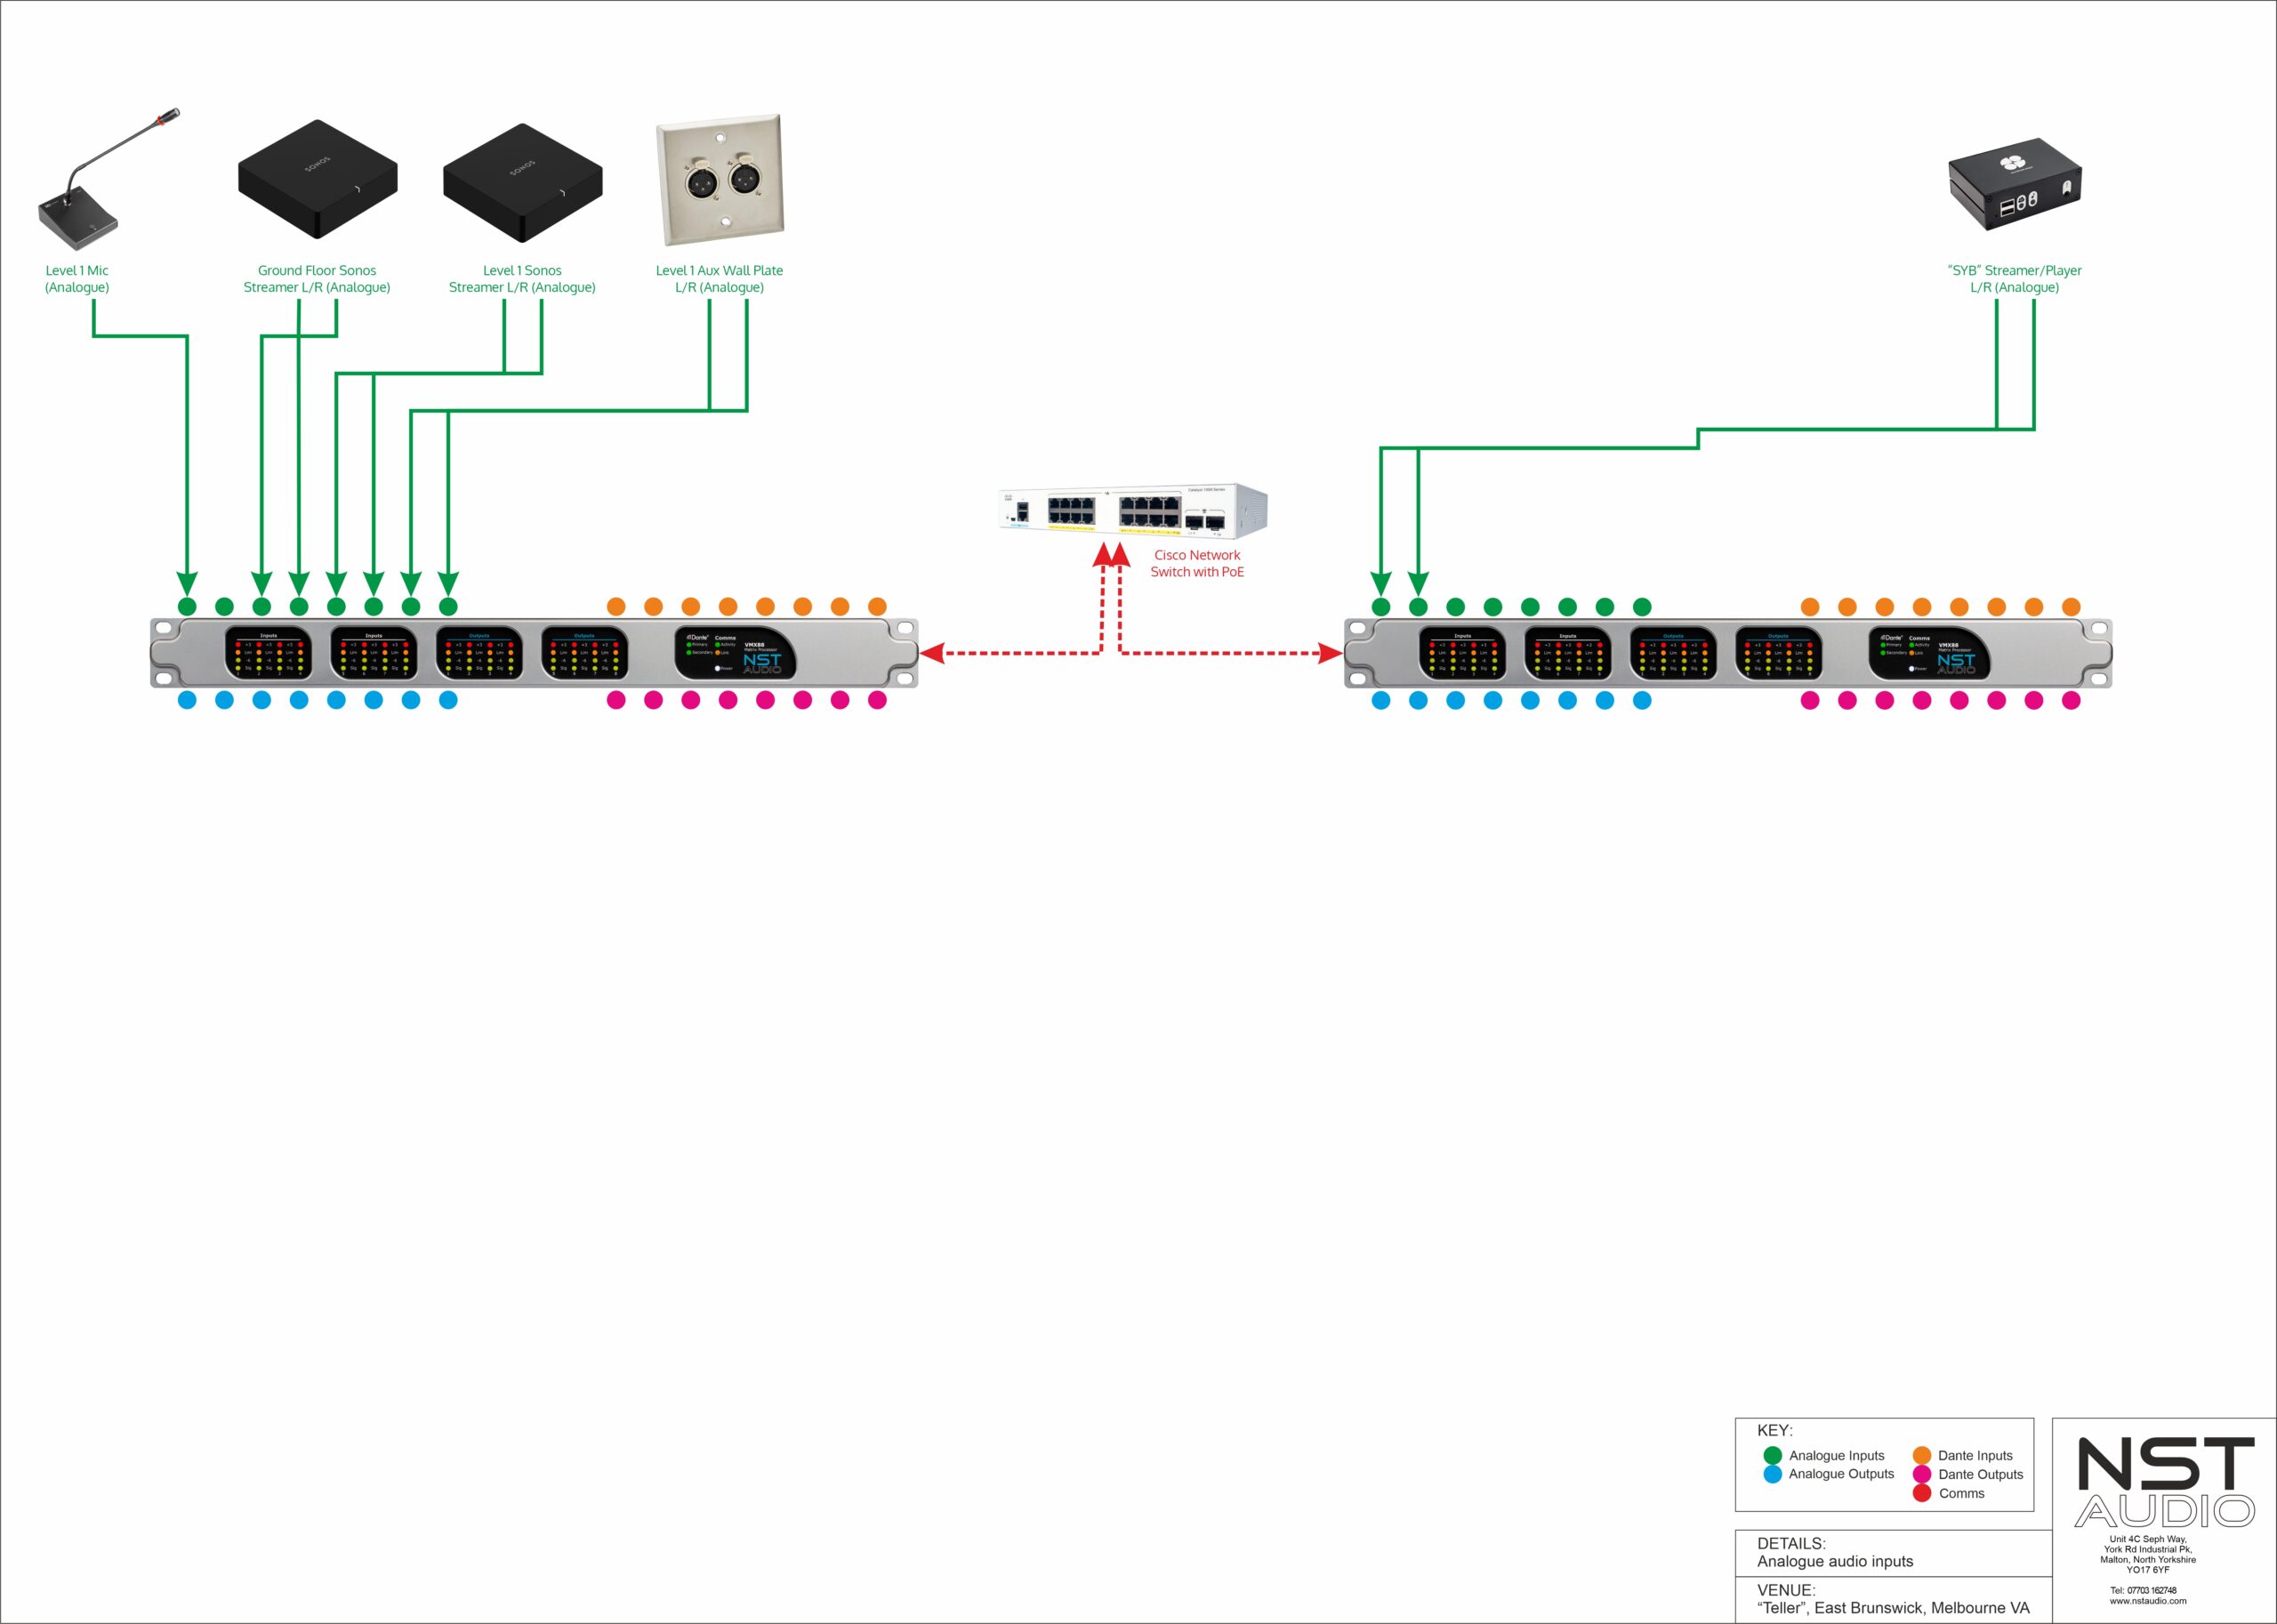
Let’s take our first look at D-Net’s representation of the two processors and their analogue inputs. As all the sources are stereo, these pairs of input channels have been linked within the processors so they track and adjust together.
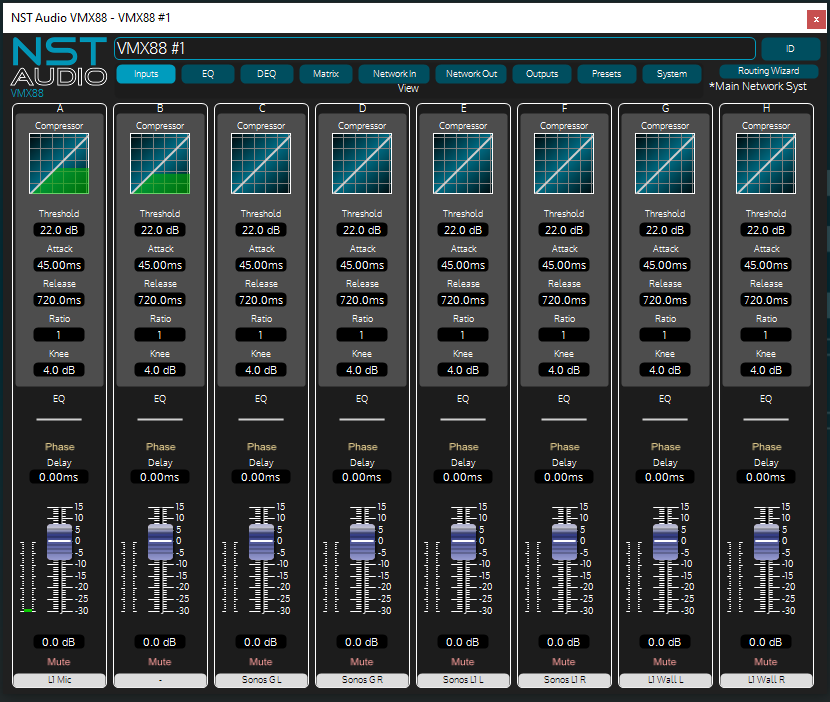
Processor number 1 – Analogue inputs are named to map onto channels as in schematic…
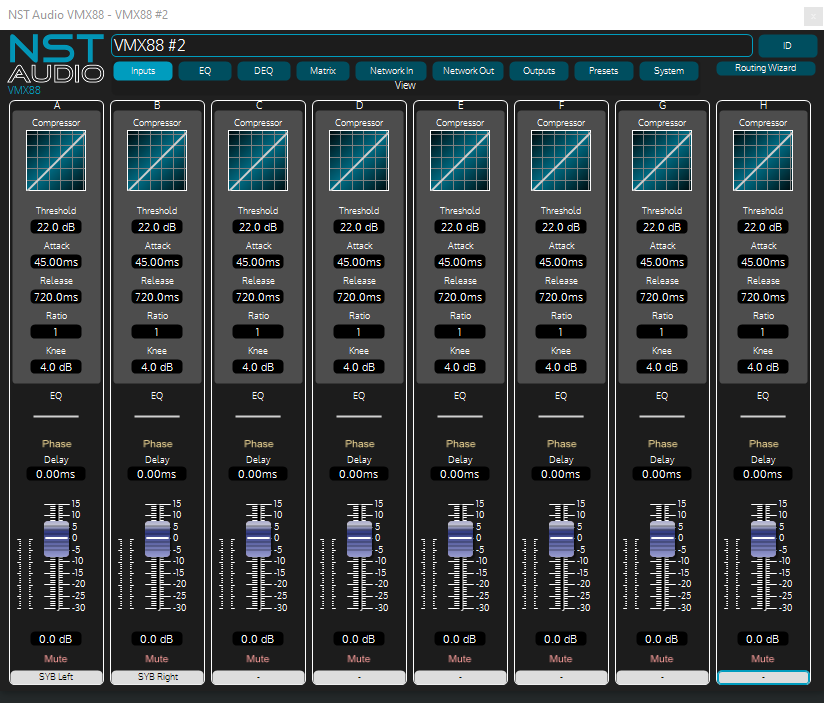
…and processor 2 – Analogue inputs are named to map onto channels as in schematic
Leveraging Dante for Distribution
As the VMX88 has the ability to transmit analogue audio back onto the Dante network, this means any analogue inputs connected to either device can be made available to the other device.
The Network Out settings on each VMX88 determine which channels and where in the signal chain the eight output streams are taken. The names of these outputs correspond to the TX channel names set in Dante Controller and are automatically copied over into D-Net.
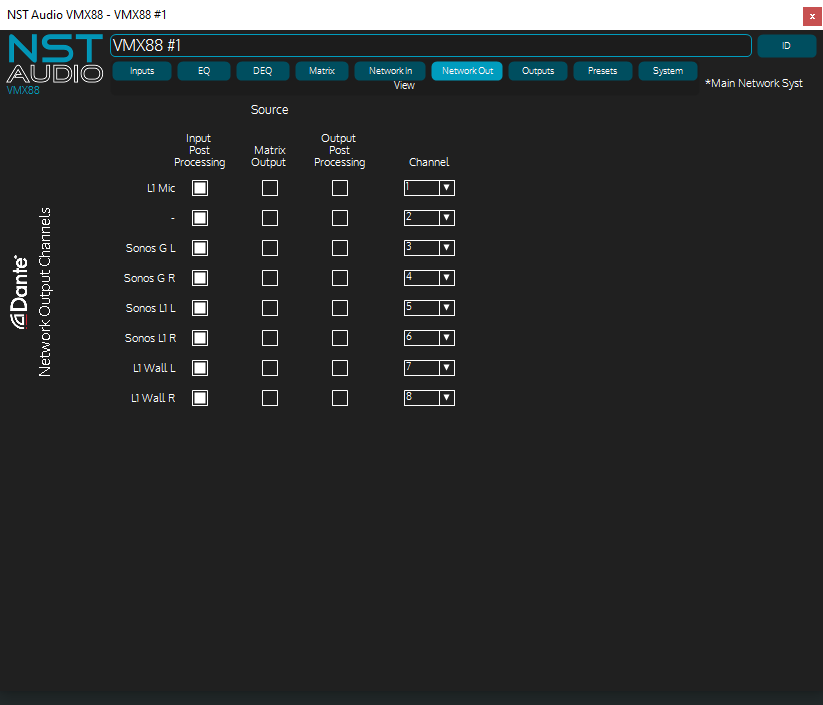
Network Outs on each device – all are sourced post input processing
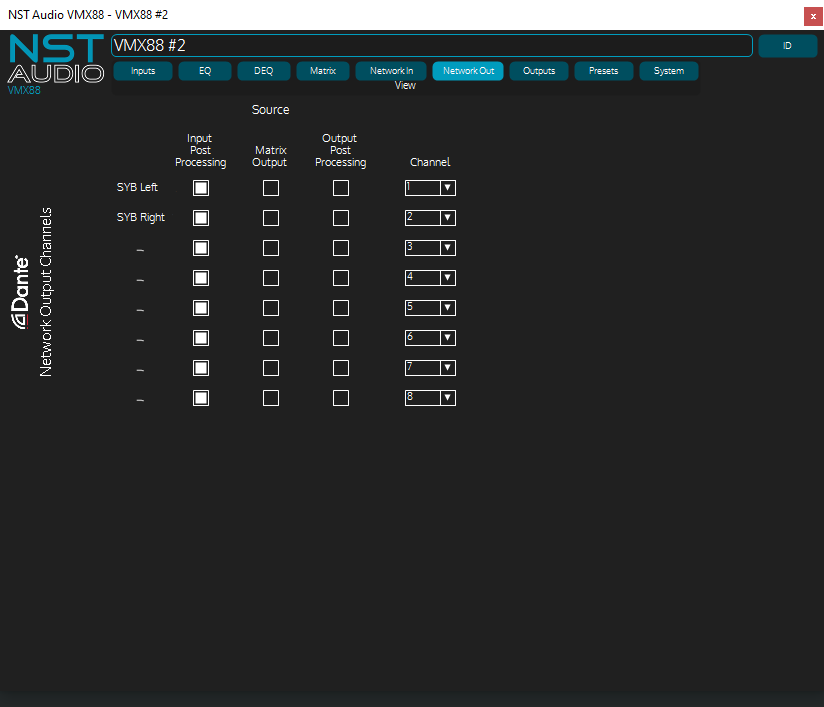
Network Outs on each device – all are sourced post input processing
This allows the following audio sources to be included on each device though a combination of the VMX88’s network settings and Dante Controller.
VMX88 #1:
Dante Inputs
1: Pavilion DJ Via Bluestream DA11 Left
2: Pavilion DJ Via Bluestream DA11 Right
3: Pavilion Mic (via DA11)
4: NC
5: “Soundtrack Your Brand” (via analogue on VMX88 #2) Left
6: “Soundtrack Your Brand” Right
7: Pavilion TV Left
8: Pavilion TV Right
VMX88 #2:
Dante Inputs
1 : Pavilion DJ Left
2 : Pavilion DJ Right
3: Pavilion Mic
4: L1 Mic
5: Sonos Streamer Ground Floor (Restaurant/Pavilion) Left
6: Sonos Streamer GF Right
7: Sonos Streamer L1 Left
8: Sonos Streamer L1 Right
The next iteration of the system layout is now complete, incorporating the network audio sources and the various inputs chosen to be picked up by each unit – click to open in a new window for a closer look…
Zones and Outputs
The inclusion of two VMX88s meant the installation had plenty of scope for multiple zones and sub-zones to be created to give the client the level of control over each area of the venue.
Factory’s choice of the Australian brand Quest Audio for speakers and amplifiers allowed the installation to include a mix of low impedance and 100V distribution where appropriate.
Quest’s innovative mounting hardware include a patented wall mounting system using a pan/tilt system based around a ball and socket mechanism with 10 degree accuracy that cannot slip over time. The MX Series in particular were chosen for their discrete stylish appearance and feature titanium dome tweeters for a smoother sound – a consideration given the restaurant and close proximity to clientele.
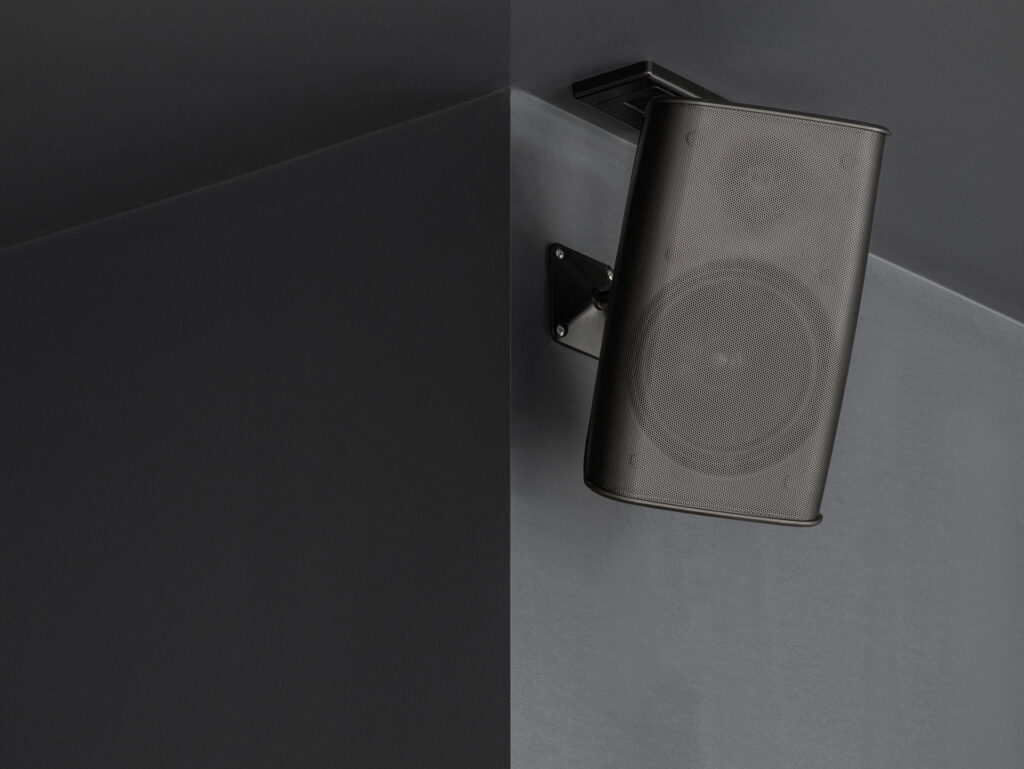
Quest MX Series speakers, with ball/socket mechanism and discrete appearance
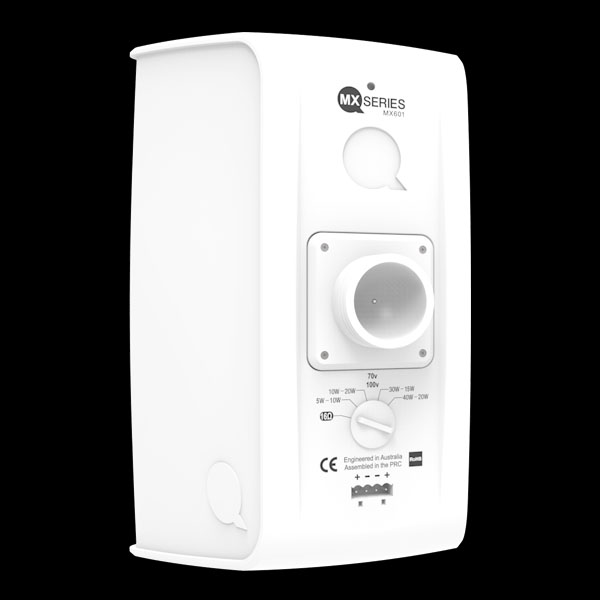
Quest MX Series speakers, with ball/socket mechanism, 100V line capability
The following zones were created and then translated to D-Net:
Zone 1: Front Dining Room: Low Z, 2 x MX601/Channel stereo + MSX6 Sub [3 ch.s]
Zone 2: Pavilion: Low Z, 2 x HP125/Channel + 2 x HPI 12S Subs [4 ch.s]
Zone 3: Annex: Low Z, 2 x MX601 stereo (full range) [2 ch.s]
Zone 4: Courtyard: Low Z – 4 x MX601 mono (full range) [1 ch.]
Zone 5: Corridors: Lo Z, 2 X MX6 mono [1 ch.]
Zone 6: Bathrooms: 100V, 6 x QTC2080i mono [1 ch.]
Zone 7: Stairs: Lo Z, 1 x MX601 mono (full range) [1 ch.]
Zone 8: L1 Functions: Low Z, 2 x MX801/Channel stereo + MSX10 Sub [3 ch.s]
This gives us 16 outputs and they are mapped to the VMX88s like this:
VMX88 #1:
1: Pavilion Top L
2: Pavilion Top R
3: Pavilion Sub 1
4: Pavilion Sub 2
5: Bathrooms
6: Level 1 Functions Top L
7: Level 1 Functions Top R
8: Level 1 Functions Sub
VMX88 #2:
1: Corridors
2: Stairs
3: Annex FR L
4: Annex FR R
5: Courtyard FR
6: Front Dining Room L
7: Front Dining Room R
8: Front Dining Room Sub
Mapping of zones to outputs is an arbitrary choice as all outputs are identical in DSP processing capabilities. Often the choice of outputs is determined by amplifier configuration and cabling.
The zones are notionally created by the naming of the outputs and of course their routing requirements. Additionally, the choice of speakers following the amplifiers will determine both any crossover functionality and the setting of limiter thresholds to protect each part of the system.
Below are the named outputs and, as can be seen on the EQ previews for each output channel, there are different crossovers in place for different speaker components.
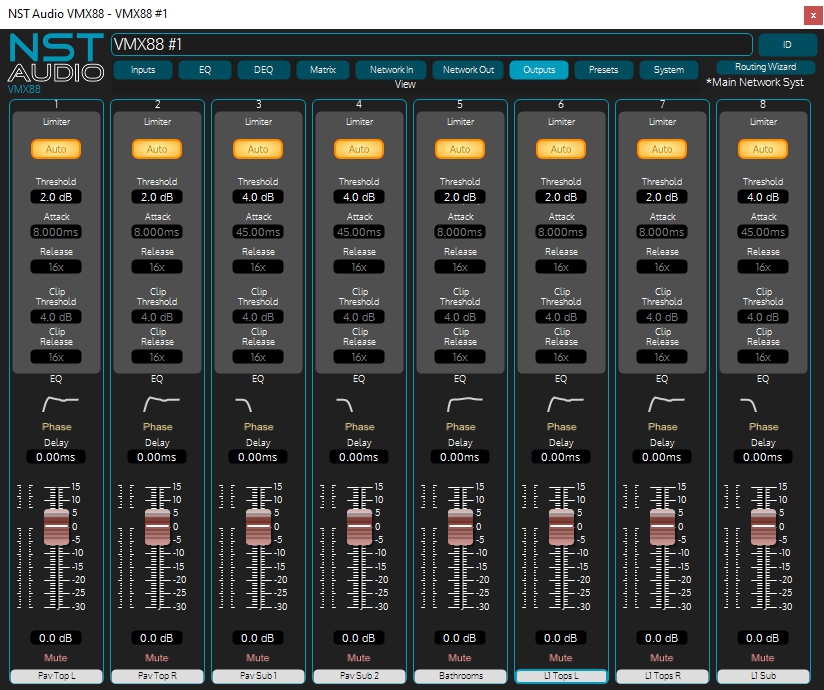
Zones are named to map onto output channels as in schematic

Zones are named to map onto output channels as in schematic
For example, as the “Bathrooms” zone is driven as a 100V line system due to the multiple speakers on a single amp channel, a70Hz low high pass filter as bene introduced to prevent TX core saturation, and a mid-range lift to add clarity in the noisy bathroom environment.
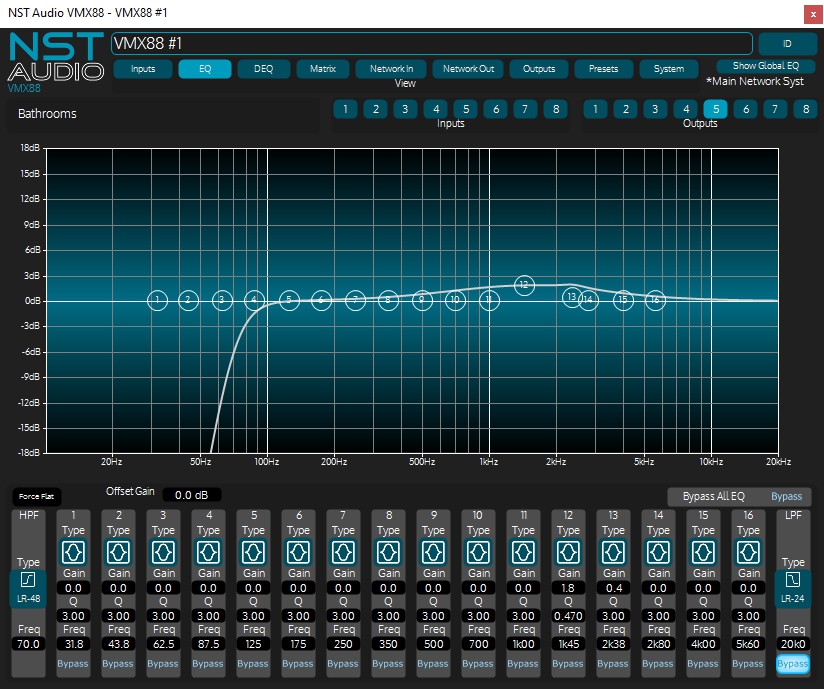
“Bathrooms” zone showing EQ in place
In the case of the dining room system, the top boxes for each channel have been rolled off at 85Hz as they are integrating with a sub, and the mids have been cut slightly to lend the system, a warmer feel at lower levels, as befits a BGM system in a dining environment.
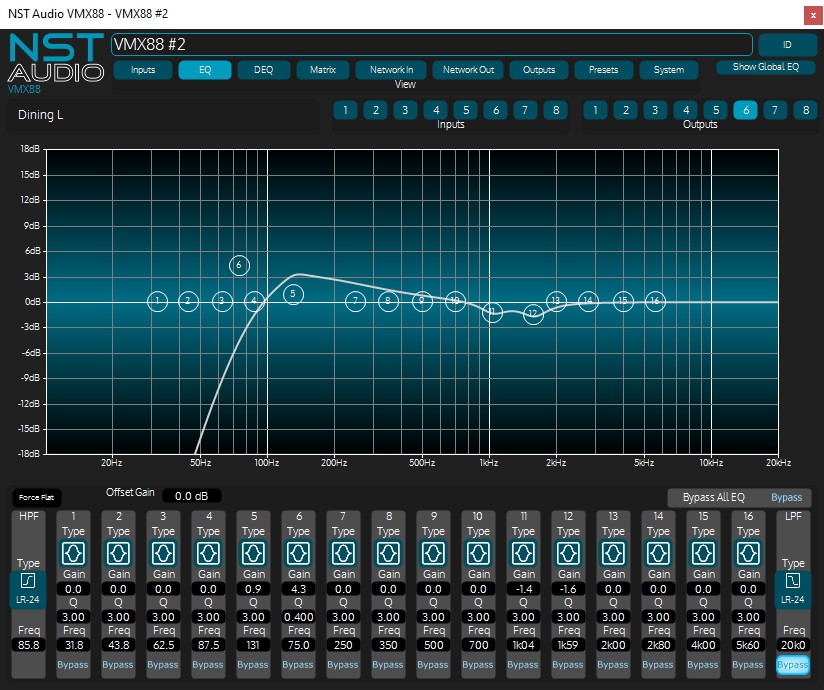
“Dining Room” zone top boxes with light mid EQ cut and roll-off for sub
The next iteration of system layout now contains all the output to zones connections. The amplifiers have been left out of the schematic for clarity. Click on it to see in more detail…
Using VR1s to Tie Zones Together
The functional specification for the system included three VR1 controllers which would give control over different parts of the system locally, and group outputs further into physical zones.
There is a VR1 wall mounted in the Level 1 Function Room accessible to staff and public (or customers renting the venue), one wall mounted behind the Pavilion Bar, and one mounted on a custom table wedge at the POS till in the dining room.
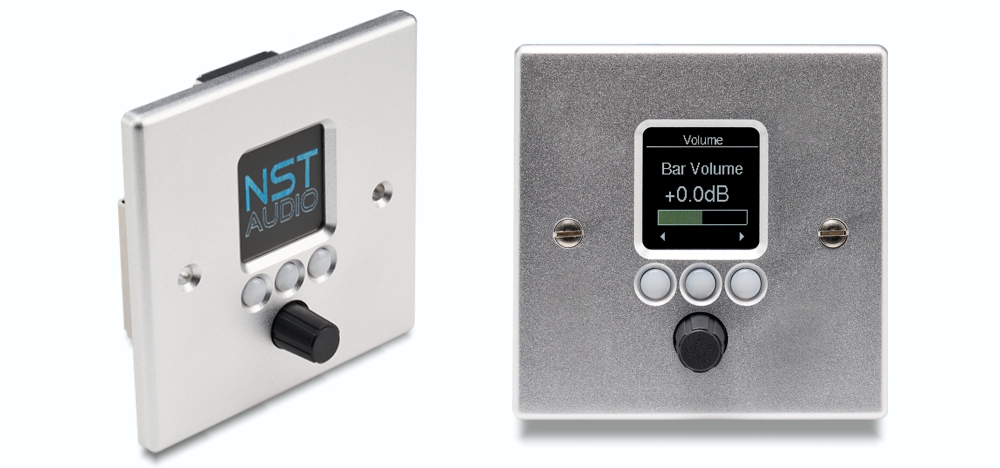
VR1 Venue Remote: Wall mounted PoE remote control
Functionally, these are all programmed to control different aspects of the system, which we will now explore in detail.
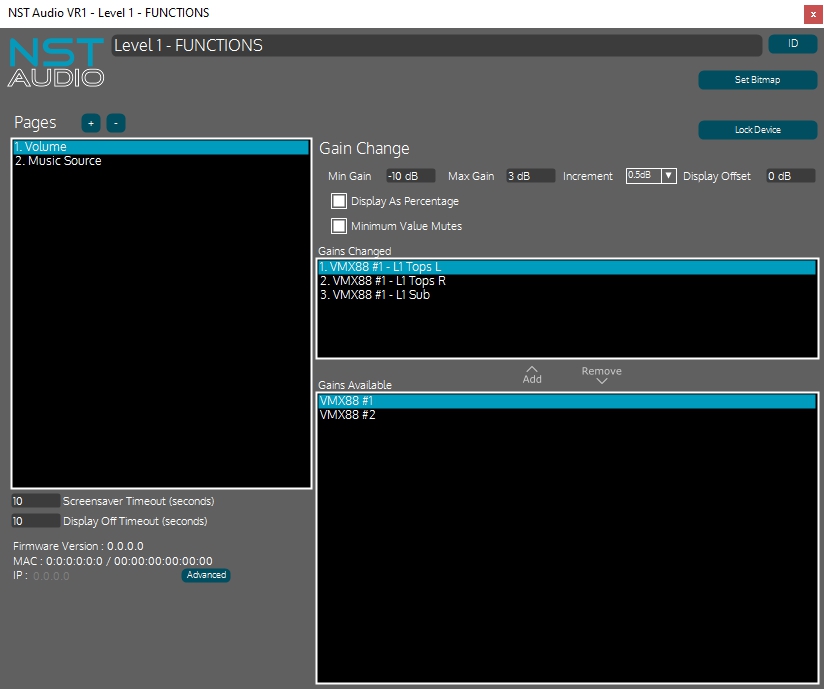
Level 1 Function Room VR1
Starting with the Level I function room VR1, it’s been kept simple for the use of bar staff and also customers who have rented the room. It’s been configured with just two pages – a volume control that adjusts the tops and sub together, with a limited range of positive adjustment (max of +3dB above the default) and the display is set to show a percentage readout instead of dB for a less “technical” display.
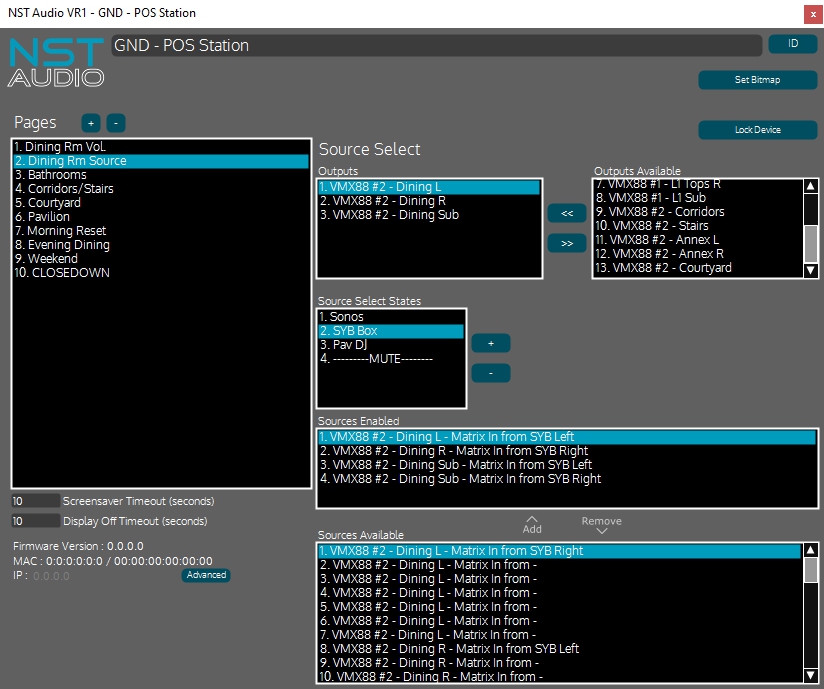
There is also a source select page which allows the inputs local to the room to be selected and also a feed from the Sonos in the main bar if just BGM is required.
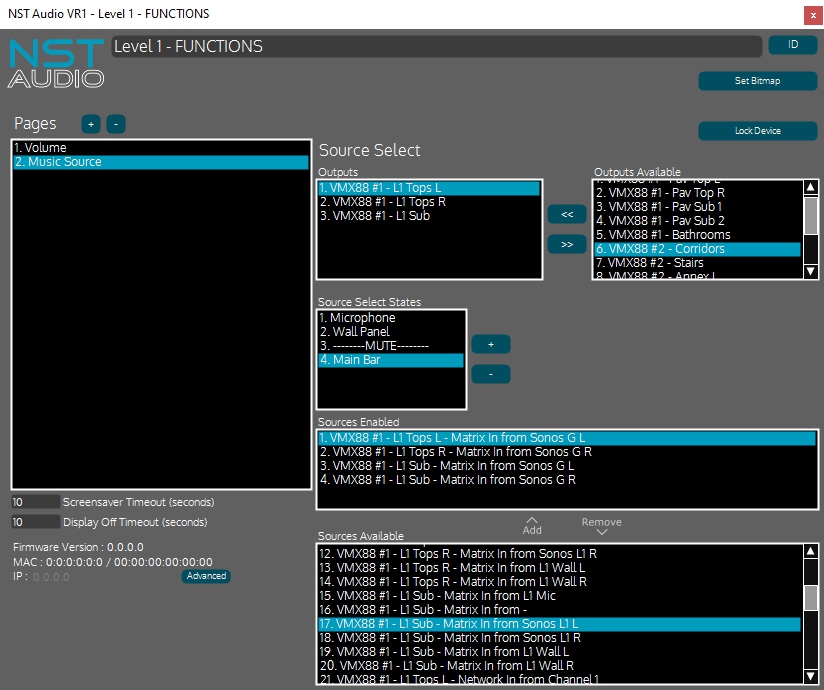
Note the use of an additional source marked “—–MUTE——–“. This is a quick way to turn off the local audio by just deselecting all the matrix sends for the selected outputs. By not populating any “Sources Enabled” for this state, the matrix sends are all muted. Selecting a different source will then “unmute” the audio.
Pavilion VR1
The Pavilion VR1 offers a similar level of control to the L1 Function Room. There is a volume control linked to the outputs for the tops and subs, creating this zone. A audio source selector is configured to choose between the TV audio (via Dante) the DJ local to the Pavilion stage (again via Dante) and the Front Bar’s Sonos when only BGM is required.
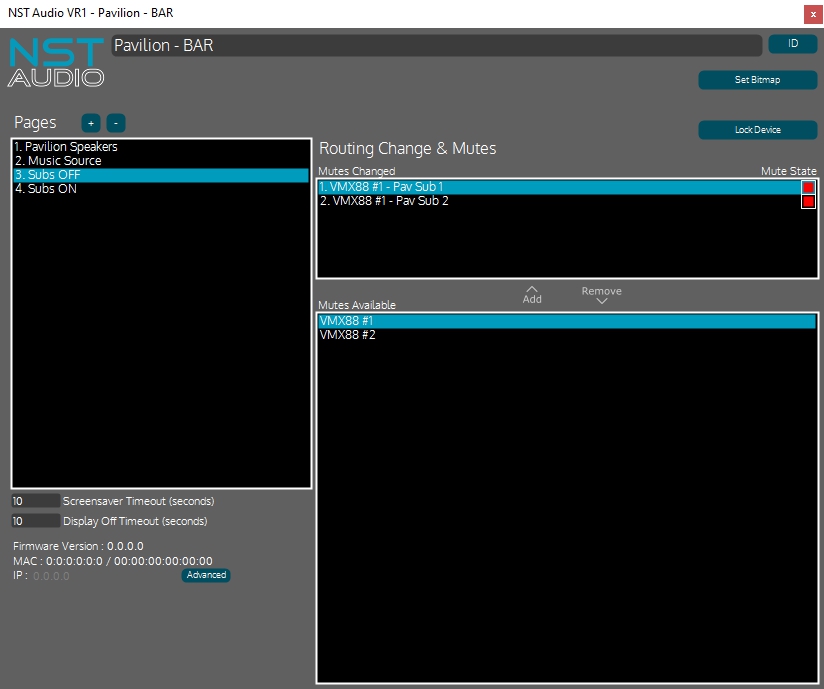
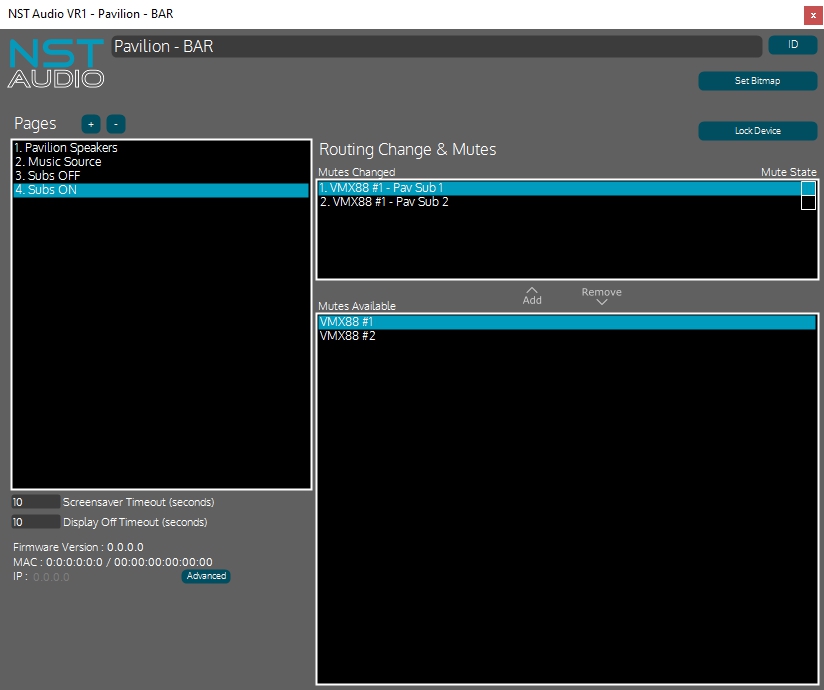
Additionally, the subs connected in this zone can be independently muted and unmute via two extra pages using routing change controls.
Front Dining Room VR1
The VR1 that is by the POS terminal is thought of as the system “Master” and is slightly more concealed and therefore not accessible to the general public or, in the main, bar staff. This means that some additional controls can be safely added which allow for adjustments and resets of the entire venue’s system without having to access the amp rack or processors via D-Net.
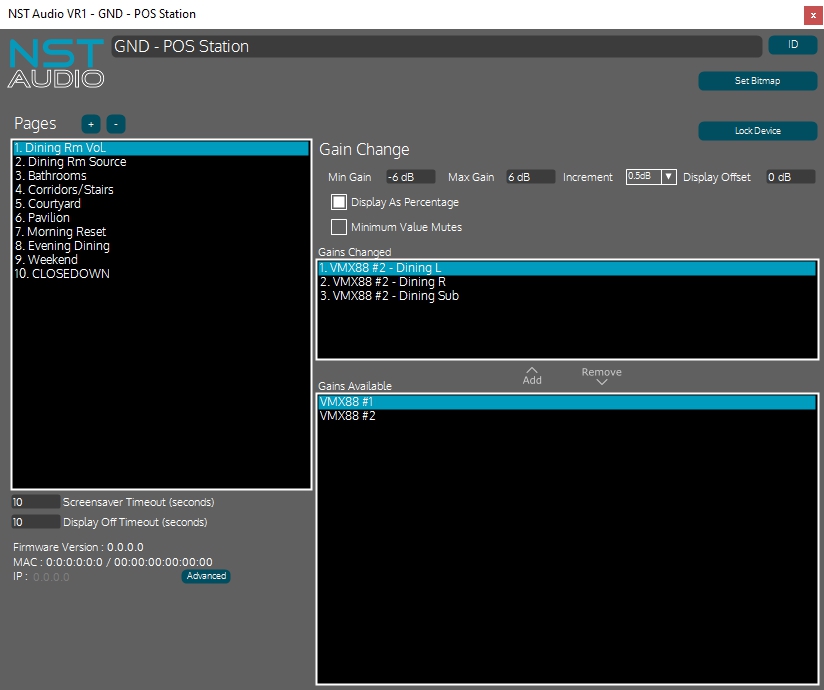
The first two pages are the “day to day” controls – the volume of the dining room zone via its stereo tops and sub. The gain range available has been set to offer +6dB cater for different times of day and occupancy levels.
The music source selector allows a choice of the ground floor Sonos audio (via Dante), the “Soundtrack Your Brand” BGM player, and the Pavilion DJ audio (via Dante).
As with the Function Room VR1, there’s also a local “MUTE” added here, created by not having any enabled sources.

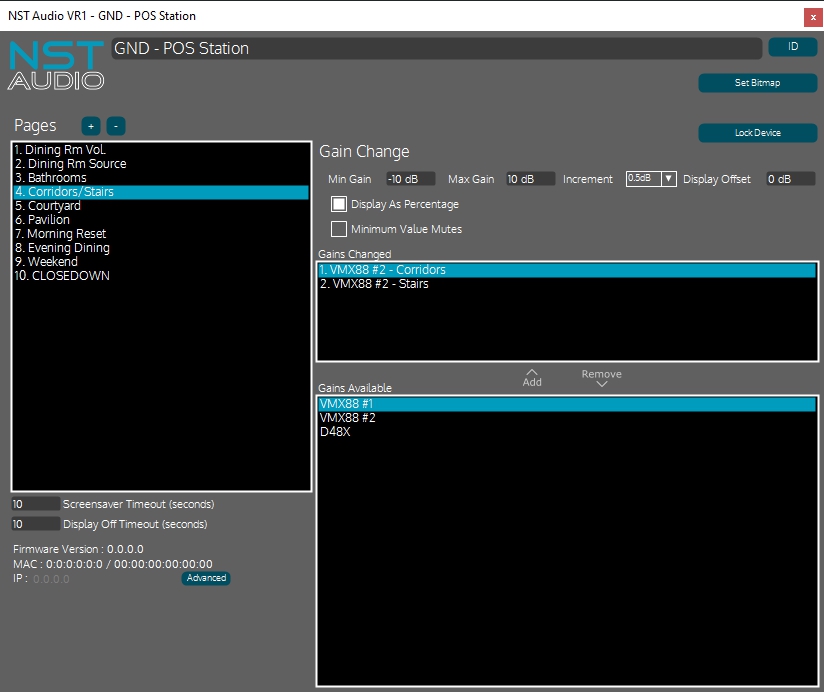
Beyond these controls, there are four additional zone volume adjustments for the Bathrooms, the Corridors & Stairs (two zones adjusted together) the Courtyard and the Pavilion.
Lastly, there are a set of preset recalls , designed to reconfigure the entire venue with a single button press, dependant on circumstances and time of day.
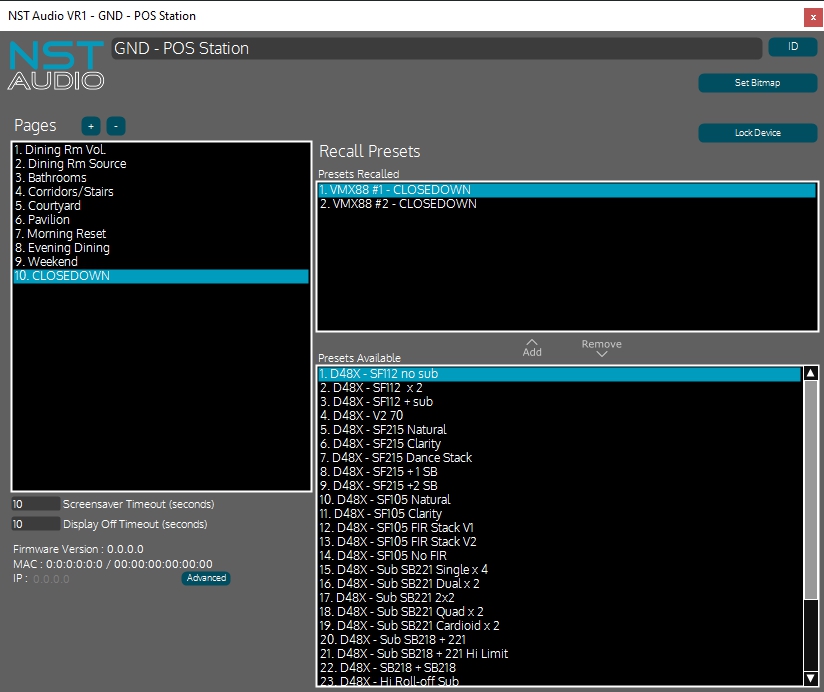
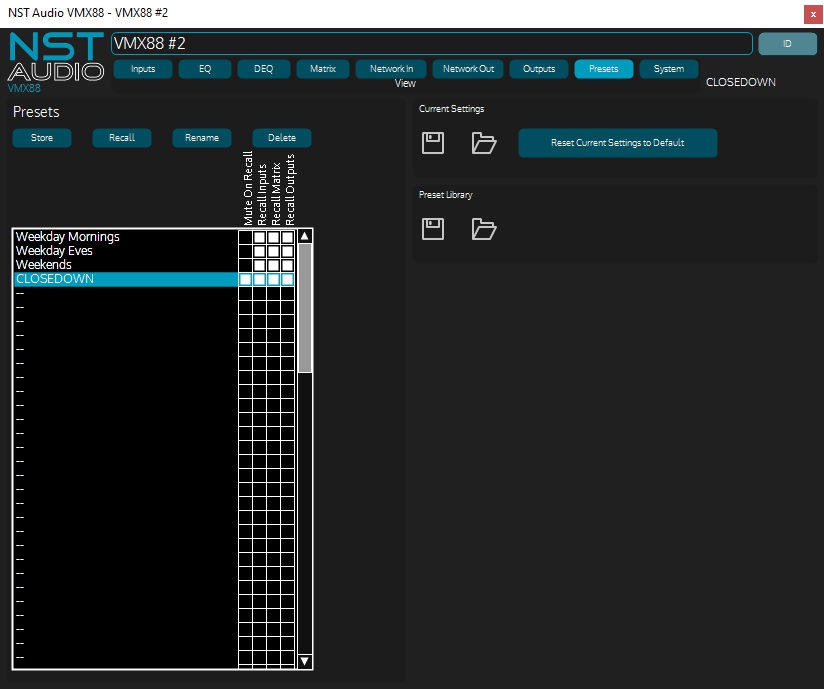
These are system-wide preset recalls that depend on both processors having been preconfigured for certain scenarios and then these presets stored locally on each device. These can then be recalled as required.
In this instance, we have a “Morning Reset” that adjusts all volumes back to normal for the daytime, selects the required music sources (BGM in all cases) and turns off subs in some areas.
The ”Evening Dining” scene turns on the Pavilion system, and selects a different music source for the front dining room, as well as adjusting the EQ in the dining room and Pavilion zones for a more forward sound. The ”Weekend” scene enables the Pavilion subs, and sets the default overall levels slightly higher for Bathrooms Corridors and other outside spaces.
Lastly, through the use of the “Mute On Recall” feature that can be associated with individual presets, the “CLOSEDOWN” preset will mute all outputs at the end of service on any night. A scene recall of any of the others will automatically unmute the system again.
And our system is complete! The final layout now includes the three VR1s and their connection to the PoE Cisco router. Click on the schematic to have a closer look…

Conclusions
Factory Sound have succeeded in creating a flexible, highly controllable, and above all great sounding system with this installation, but don’t just take our word for it!
Back to Melanie Aldred, who had this to say about the system:
“I’m extremely impressed. We’ve had a noticeable number of guests comment on the quality of sound that the system can deliver. Both the patrons and the staff agree that the system sounds fantastic. Group Technologies and Factory Sound went above and beyond when it came to the design and the roll out of this setup. Teller now has a fit-for-purpose solution that’s easy to navigate and perfect for our needs.”
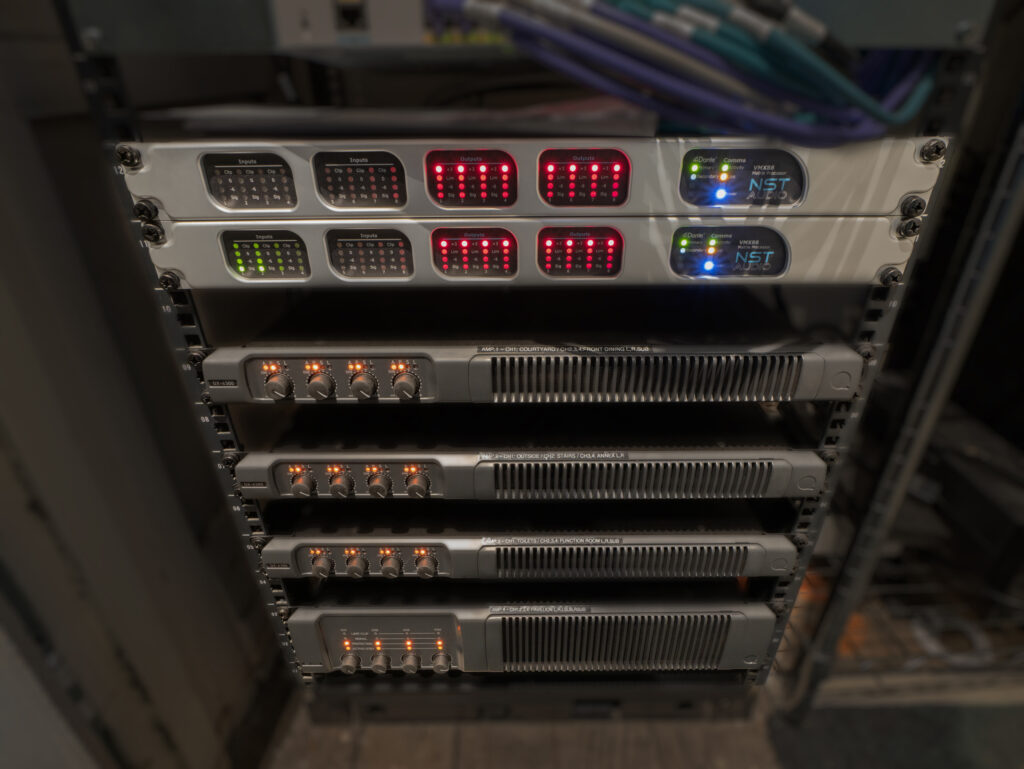
VMX88s doing their work in situ
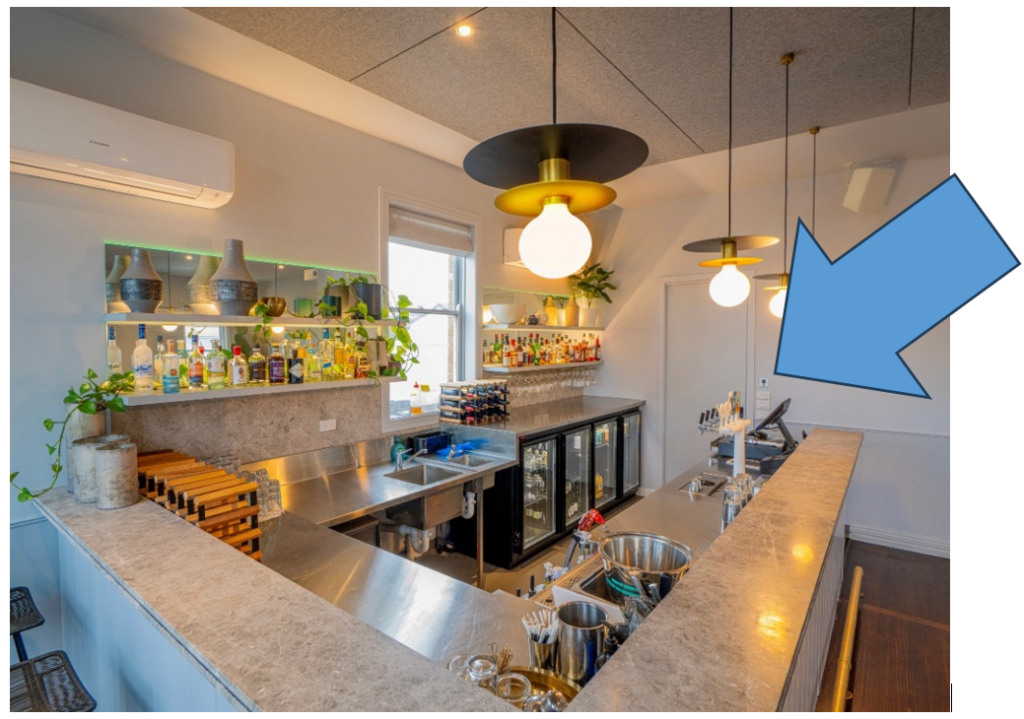
VR1 in situ in the Level 1 function room – see that arrow? There it is!
VR1 branded with the TELLER logo
Further information, and further improvements…
Have a look at our VMX88L training video which shows, in just 9 minutes, how to fully configure a unit for a typical installation, including setting up crossovers, labelling and routing, and handy shortcuts to speed up the process.

9 minutes will show you how to configure this system!
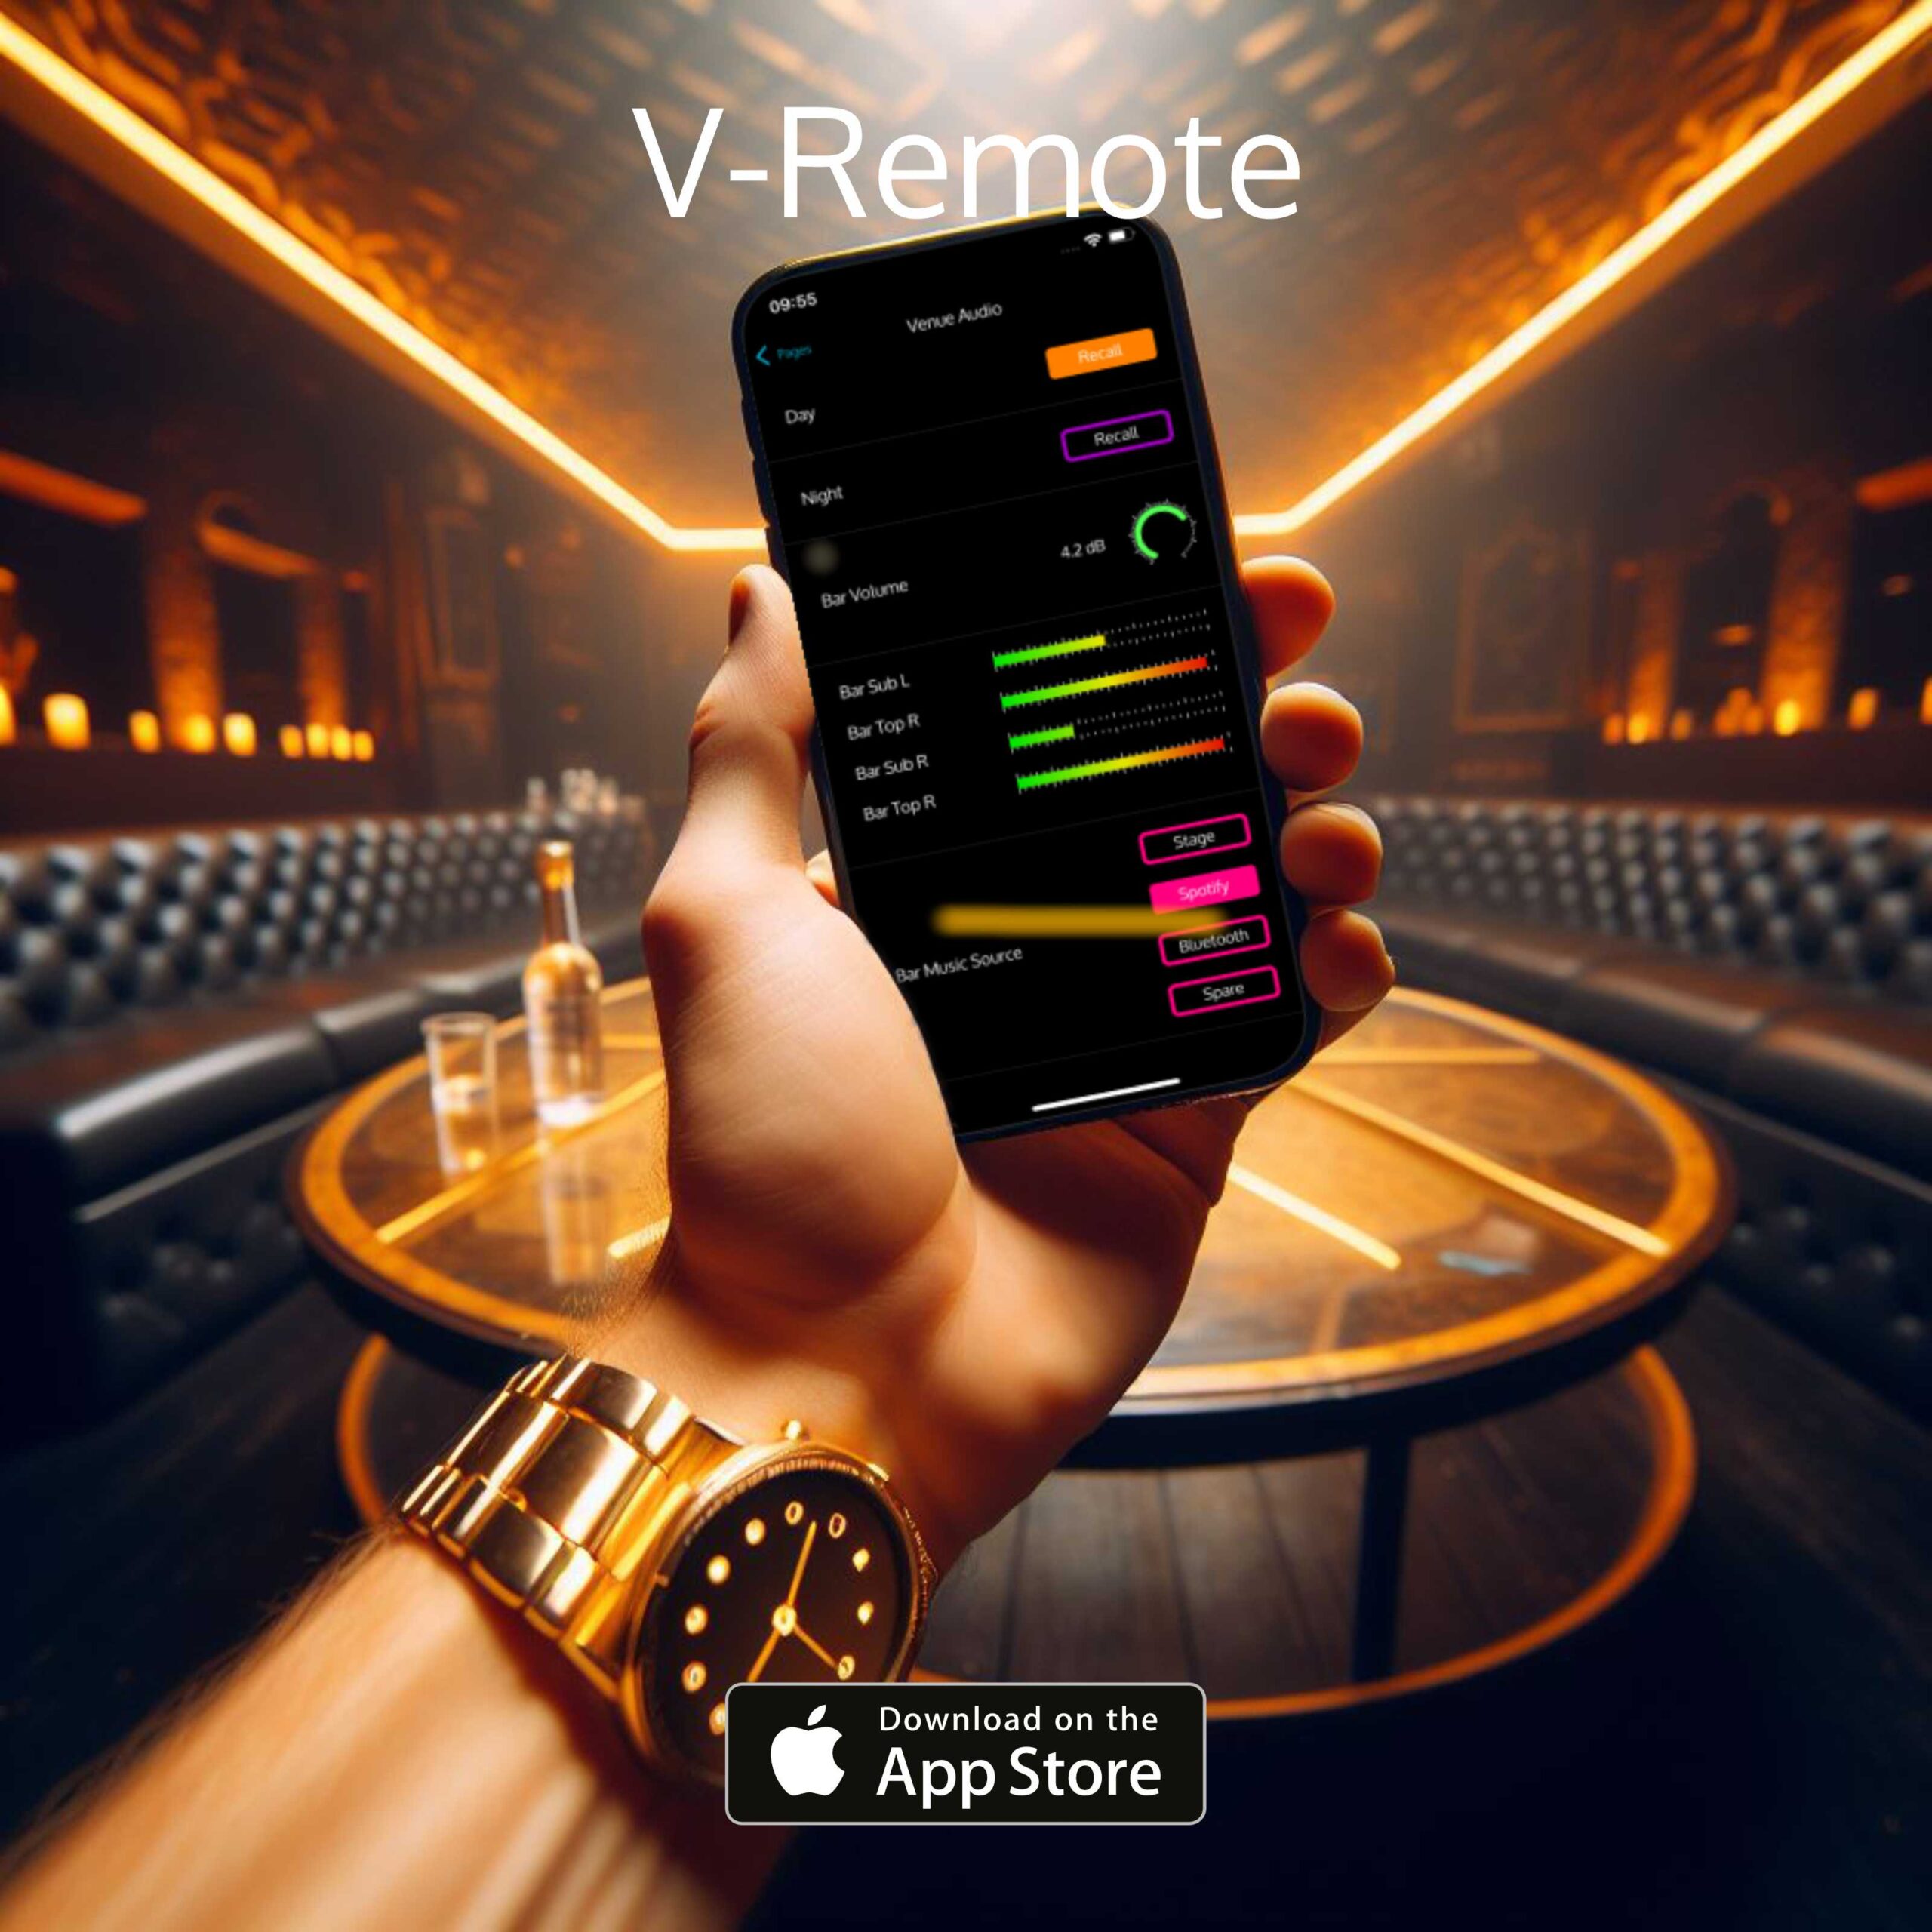
With a WiFi network already in place in the venue, the new V-Remote app could be configured to offer staff roaming control of the venue, with all various levels of access, perhaps mirroring the three VR1s installed. Find out more about V-remote page…
Thanks for taking the time to read this case study – if you’d like to download and read off-line – get the pdf version here.